Pages

Tuesday, May 31, 2011

Gallery Shelves: A More Awesome Wall of Awesome


When I saw DIY gallery shelves by Ana-White on Pinterest I knew what our Memorial Day Weekend project was going to be. After five years, our Wall of Awesome was starting to show it's age a bit and I wanted something that would allow easier dusting, more variety and less holes in the walls.

Here's some Wall of Awesome sections

Before:

Pretty cool, no? 
But it's very hard to dust or rearrange and it leads to this:

A giant wall of Not-So-Awesome

So after more patching then I care to recall, we got to paint.

Antique Tin - Behr Premium Plus Ultra

Meanwhile we made shelves. While the ledges are in fact, "Ten Dollar Shelves", and for eight feet no less, they are anything but quick and easy and it took us all weekend to paint them on all sides, several times, and get them up on the wall in a reasonable fashion.

My living room... because it was SNOWING all weekend and too cold in the garage... yes, I am yelling:


Don't believe me? Here's where we planned to grill:


Anyhoo~

Finally at literally the eleventh hour (or 2300 if you're so inclined) we had the shelves painted, assembled and hung. Hooray. I kinda threw the frames up without a ton of thought because it was the middle of the night everything up there is special to us and I know I'll be messing around with them indefinitely. 

The Wall of Awesome, now, Awesomer!


They're so pretty! Well worth the time and effort. 

I have more DIY projects from this weekend to share with you over the next little while, If you have any questions please let me know.

~~~~~~~~~~~~~~

I'm a Ginger Gem! Yay!  I made this card for their Cowboys and Cowgirls  Challenge and mine was one of the ones chosen for honors. Thanks so much, Gingersnap Creations.


Linked Up With:

Friday, May 27, 2011

Cake #16: Triple Lemonade Cake


We love all things lemon and since joining Pinterest (that site is worse then Facebook for stealing time, I love it!!!) I've had the pleasure of running across oodles of lemon recipes. But you don't want to read about a project that is an endless parade of lemon cake after lemon cake, do you?


So I decided to combine two cake recipes into one, hopefully selecting the best parts of each and then move on to a new flavor (Tres Leche, maybe). This flies in the face of my most hard and fast cooking rule, Make it is as written the first time. No exceptions. 

Eh, let's live life on the edge and make an exception... just this once.

The recipes I pulled from are Lemonade Cake with Lemon Cream Cheese Frosting by Cookies and Cups (love her recipes!) and Lemonade Layer Cake from My Recipes (originally from Cooking Light). The first one looked great but used a bought cake mix as the base and I try not to do that too much with 52 Cakes. The second one had a from-scratch recipe but lacked the awesome glaze that soaks into the cake before frosting. 

I also made my own frosting. We like our frosting light and fluffy, like soft whipped cream. So if you prefer you frosting so sweet it makes your teeth ache, please don't use my recipe. It won't make you happy. If you look at the picture below, you can see air bubbles - it's that fluffy. We also don't use a lot of food color in our house. The kids were very shocked that I added SO MUCH YELLOW!!! 

I know, it's so garish you need sunglasses to look at it. *sarcasm*


As you can see, the cake is very moist. Perhaps a little too moist to have added a glaze too... but it had incredible texture and flavor. It's also dense, not heavy but dense. A lot of scratch cakes are more substantial then boxed mixes, that's both their glory and their strangeness. 

My only true complaint is that it was very sweet. I prefer tart lemon to sweet lemon flavor. I've noticed that most "light" cakes tend to be overly sweet. I think that's why I prefer the full-fat kind. Cakes are so finicky that I'd need to have a lot of spare time on my hands to make it over and over until I could reduce the sugar without messing up the structure. That's not going to happen.


For the cake:

1 1/3 cups granulated sugar
6 tablespoons butter, softened
1 tablespoon grated lemon rind
3 tablespoons thawed lemonade concentrate
2 teaspoons vanilla extract
2 large eggs
2 large egg whites
2 cups all-purpose flour
1 teaspoon baking powder
1/2 teaspoon salt
1/2 teaspoon baking soda
1 1/4 cups fat-free buttermilk
Cooking spray


Directions:

Preheat oven to 350°.
Place first 5 ingredients in a large bowl; beat with a mixer at medium speed until well blended (about 5 minutes). 
Add eggs and egg whites, 1 at a time, beating well after each addition. 
Lightly spoon flour into dry measuring cups; level with a knife. Combine flour, baking powder, salt, and baking soda; stir well with a whisk. 
Add flour mixture and buttermilk alternately to sugar mixture, beginning and ending with flour mixture; beat well after each addition.

Pour batter into 2 (9-inch) round cake pans coated with cooking spray; sharply tap pans once on counter to remove air bubbles. 

Bake at 350° for 20 minutes or until wooden pick inserted in center comes out clean. 
Cooking Light , APRIL 2002


For the Glaze (this is the bit I adapted from the Cookies and Cups cake):

2-4 TBL Lemonade from concentrate
1 cup powdered sugar
1 TBL water 

Cool cakes for about 10-20 minutes and then mix up your glaze. We used twice as much lemonade concentrate as called for because we like things sour. I'd say add 2 TBLs, taste the glaze and add more if you'd like. 

Poke holes all over your cake with a fork and then spread the half of the glaze over each cake. If your cake had a crown above the pan, you can trim off the crown and then poke the holes.

Cover with waxed paper and let cool completely.

Frosting:

1 8oz package of softened 1/3 less fat cream cheese
1 stick of softened butter (1/4 Cup)
approximately 4.5 Cups of powdered sugar
6TBL lemonade concentrate or to taste
yellow food color if desired

Whip butter and cream cheese until very light.
Add 3 TBL of lemonade, mix in.
Add sugar one cup at a time until mixed in.
Add food coloring and remaining lemonade to taste and desired consistency.
Frost cake. 

*Note: This is a very soft, not-too-sweet frosting. It cannot be piped or manipulated much but it's full of flavor and light as air. If you like a stiffer frosting, add more powdered sugar.

To make frosting the cake easier, apply a very thin layer over the whole cake (a crumb coat) and then pop it in the freezer for a half an hour or so. When you frost it with the "real" layer it will stick beautifully, you won't have crumbs messing things up and the cake won't tear. All good things.


(don't mind the bicycle etc. behind his head *sigh*. We're painting the bathroom it's contents is in the front room and my bicycle is indoors so I can attempt using the trainer while my foot heals. Classy, I know)

Linked Up With:

Thursday, May 26, 2011

Gumbo Ya-Ya: Thanks Oprah

I never watched, liked or followed what Oprah was up to all that much. That said, back in '96 during the Bob Greene hay-day I was tempted to try their recipe for a lower-fat gumbo and we've been making this delightful dish ever since. The story goes that Oprah, while on one of her endless diets had a mighty powerful craving for Gumbo or Jambalaya so she had her chef whip up a diet-friendly hybrid dish...

And it was good.

Now, I will never claim to know what real New Orleans Gumbo tastes like but this is a little bit of heaven in a bowl. The first time I made it, it took three days of cooking: boil a chicken, cool a chicken, separate the yucky stuff from the yummy stuff, chop, cool the broth, skim the broth, chop, chop, chop! It was endless and impractical with three kids under two and half. So I tweaked, and tweaked, and tweaked some more. No more whole chicken (thank heaven, they're disgusting) no more all-day cooking. Now we can start it at noon and be eating at dinner. You could be even quicker if you were willing to sacrifice some simmer time.

Here's my new and improved version. It's possibly the greatest food I make...well, except for Arroz Con Pollo or Beef Burgundy... it's definitely top three.


The silkiness of the sauce will blow your mind and don't let making a roux scare you, this isn't the persnickety butter bomb of french cuisine. It's light and friendly and you know the roux's ready when it looks like you've got a pot full of peanut butter.


Gumbo Ya-Ya
Three large chicken breasts
8 C of chicken broth, water and bouillon to taste. Use at least one can of broth.
2 packages kielbasa (we use 1/3 less fat turkey kielbasa)
1-2 TBL oil
1/2 C flour
1can tomato paste 
1 C each of green pepper, onion and celery
1 box (10 oz) frozen okra
2 bay leaves
2 tsp thyme
1 tsp each of red and black pepper
½ tsp allspice

Optional: 1/2 - 1lb of peeled and deveined raw shrimp


Directions:

Combine broth and water, add bouillon to taste. Simmer chicken in broth until cooked. Remove chicken and set aside.  
Meanwhile, cook kielbasa in a large pot until browned. Remove with slotted spoon. 

If using shrimp, cook in sausage drippings and remove to bowl with sausage with slotted spoon.
Add oil, whisk in flour and then 1 1/2 C of broth. Stir over medium heat for ten minutes until roux turns dark brown and looks like peanut butter.
Stir in remaining ingredients. Cook and stir for five minutes.


This is affectionately known in our house as the 'Scary Looking Step" as we always look at one another and ask, "We really eat this? Really???"

Add kielbasa (and shrimp if you're using it) and remaining chicken stock. Bring to a boil, reduce hear and simmer uncovered for 20 minutes. Stir occasionally until vegetables are tender and liquid thickens.

Shred or slice chicken. Add chicken and simmer ten minutes until heated through. 


*If you want you can simmer for hours more at this point. If this is your intention, add the shrimp closer to dinner time.
Serve on rice. 
Pass hot sauce.


Want a sneak peek at tomorrows post a.k.a. dessert?


~~~
For all of you feeling a gap in your schedule on your first day without Oprah, I hope something new and wonderful is just around the corner.

Wednesday, May 25, 2011

SPARK The Event

I'm going to SPARK in October!!!


Here's the color scheme for this years event. Gorgeous!

Consider this an open invitation to all my fabulously crafty girlfriends to come and hang with me for a few days in October. It's going to be amazing!!!


P.S. I grabbed the delicious graphic Alisa made off the Spark Website. It was too cool not to share.

Tuesday, May 24, 2011

Cheesy Pesto Bread and Cache Valley

I think I'll let this picture serve as an introduction because, really, it leaves me speechless and drooling.


When the lovely ladies at Our Best Bites posted a wonderfully adaptable recipe for cheesy garlic herb bread, I had to take a crack at it. Click on the link for the specifics but generally speaking, you cut the bread in a criss-cross pattern (Jump! Jump!), slather on pesto (or garlic butter... or whatever) and then stuff cheese down the holes. See:


Bake for about 20 minutes until the bread is in bloom and nicely browned. Dive in!


I altered the recipe a bit as I didn't slather pesto on all four sides of each cube - more like one horizontal  and one vertical side per cube - and I used a lot less cheese. It was still very decadent.

My boys are trying to convince me to make a melted butter, brown sugar, cinnamon and chocolate chip version... I'm abstaining (for now).

We went on a mini-road trip to Cache Valley, UT this Sunday to see where Chris's next triathlon will be taking place. It's gorgeous there.


This is the transition area (aka boat launch)


Here's my guys near the reservoir - love places where mountains and water meet.


We decided that instead of the triathlon weekends this summer serving as a painful reminder of the fun I'm not having with this damn foot, we'd make them spa weekends for me. Now that doesn't sound so bad. Close to the Cache Valley Tri is a lovely little resort and spa. I'll get a massage and facial while my honey is tooling around on his swim, bike and run. The kids can be his cheer squad. Win-win!

Thanks for all the sweet congratulations yesterday. I'm really looking forward to sharing my CupCards To Go projects with you - they run the gamut from pink and frilly to wild, painty graffiti-esque.

Monday, May 23, 2011

My Big News: Cup Cards To Go DT

I'm very excited to announce that I've joined the Cup Cards To Go design team. YAY! it's been hard to keep it a secret the past while as I'm over-the-moon to be working with some dear friends again.

Sonda, the owner, and I have been friends for about seven or eight years. We met online through a card kit club called Self-Addressed and we even had the pleasure of sharing a room on a girls get-away a few years back. Remember this girls:

(click to see this up close)
{Wow. I was a lot fatter!}

All this is to say then when she asked, I happily agreed. Sonda is a lovely woman with a huge heart and an incredible eye for beauty and she's a runner too! - as always I'm honored to call her my friend and now I'll be adding "boss lady" to that title. *grin*

Here's a link to the lovely things said in my introduction:
Thanks, Michelle - I'll take "absolutely amazing" any day of the week. You're too kind :-)

Wanna sneak peek of what I've been doing with the upcoming kit?


June 3rd is my three year Blogversary (three years!!!) and I wanted to give something fun away. I've decided to send one of you the Cup Cards To Go June Kit. So stay tuned for more info.

~~~~

In completely different news, my youngest finally installed anime studio on our computer this weekend and he made this. I thought it was cute and a very solid first project. So... here's some proud mom sharing:


Friday, May 20, 2011

Pirate Cakes: Maple, Cinnamon, Caramel and Coffee Goodness

Calling all Scallywags to make these pirate cakes. 


This recipe was made by boys, for boys - it's not pretty, exact or frilly but it's delicious and plentiful.
We call this,

A Murder of Pirate Cakes


It seemed a fitting treat for the weekend when Pirates of the Caribbean: On Stranger Tides hits the theaters. Anyone still excited about the Pirates franchise? 

Okay, enough about movies... let's talk cake!

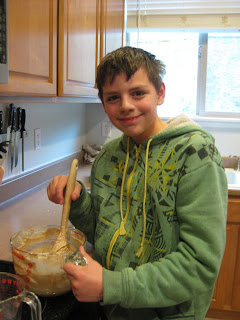
The key to this recipe is that you need a scruffy looking helper - 
preferably one in need of a hair cut and a clean shirt. I used this one:

Such a cute crewman. 

The cake is dense, spicy and not overly sweet which is lovely as it lends itself nicely to a richer frosting.
Don't be overly concerned with the crazy blend of flavors, they meld together well and the coffee (the oddball of the group) lends depth to the glaze but the flavor is nearly undetectable. 

For the Cake:


1/4 cup butter
1/4 cup vegetable oil
1/2 cup granulated sugar
1/3 cup brown sugar
2 eggs
1 1/2 teaspoons baking powder
1/4 teaspoon baking soda
3/4 teaspoon ground nutmeg
1 teaspoon cinnamon
3/4 teaspoon salt
1 teaspoon maple extract
2 2/3 cups all-purpose flour
3/4 cup non-fat milk
1/4 cup Cinnabon flavored International Delight Creamer :


(It's also fine to use a full cup of milk and no creamer but where's the fun in that?)

Directions:

Preheat oven to 425 degrees F. Line pan with cupcake liners or spray with nonstick cooking spray. We made 24 mini-sized and 10 regular pirate-sized ones. They're SO cool!


Beat together butter, vegetable oil, and sugars till smooth. Beat in eggs, one at a time.
Mix in, baking powder, baking soda, nutmeg, cinnamon, salt and maple until just combined.

Stir the flour into the butter mixture alternately with the milk, beginning and ending with the flour until thoroughly combined.


Spoon batter  equally into lined pan.


Bake until cupcakes are pale golden and an inserted toothpick comes out clean; roughly 15 to 17 minutes for pirate-sized cupcakes and 8-10 minutes for minis.

Cool in pan for 5 minutes, then transfer to wire rack and cool 10 minutes before frosting.


To make the glaze:


1 C packed brown sugar
½ C butter
¼ C Cinnabon International Delights Creamer (or milk)
1 tsp maple extract (vanilla is nice too)
Icing sugar (we use about 1 1/4 cups-ish)
Cold Brewed Coffee as needed - several tablespoons

Combine brown sugar, butter and creamer or milk in a saucepan; bring to boil over medium heat.
Cook and stir for two minutes.
Remove from heat and add maple.
Cool to luke warm. (I sit the pot in a bowl of ice cubes and stir like crazy. The temperature comes down really quickly.)

Beat in icing sugar until it reaches spreading consistency.


This always looks a little greasy at this stage. You can either add a little more icing sugar to make a stiff frosting or stir in a few TBLs of brewed coffee to thin it to a heavy glaze. Since the frosting is very rich, I prefer the glaze method as it's not as intense and it has a beautiful gloss.

Dip:

Drip:

Tap:

Add a flag and let it set up:


The frosting will stiffen as you're dipping the cupcakes, beat in a few more spoonfuls of coffee as needed.

This is Cake # 16 of our 52 Cakes project. I need to pick up the cake-pace!

I love trying fancy creamers  but not all of them are winners. To be honest, Coffee Mate brand is my favorite and the International Delights can be so-so... hence the baking with it. But regardless of how they taste in my cup o' Joe, they're a marvelous flavor addition to baked goods, homemade puddings (think coconut creamer in chocolate) or added to frosting. Yum!

Anyone else use them when they bake?

P.S. The cupcakes were a teeny bit dry. I think I overcooked them, but next time - just to be sure- I'm going to replace the oil with applesauce. That always does the trick.


And here's an old pirate card, I forgot how much I loved coloring skin with markers on watercolor paper. Blending is a breeze!


Stamps: Bombshell Stamps, A Pirate's Life

Did anyone guess my exciting news yet? I've been having a blast playing with the goodies in the box. Can't wait to send one along to one of you :-)

Linked Up With:
Tatertots and Jello
Whipperberry