(as always, click on the pics to see a larger picture - that way you can check out the details and texture)
Here's the text:
As soon as I got Pam Carriker's Art at the Speed of Life in the mail I tore through it while walking around the house gathering my supplies. It's wildly inspiring and she breaks down projects (with a few minor exceptions) to a level that I can play along.
My experience with art books is that they usually say, "Draw this oval. Now add features to make a photo-realistic face." You won't find anything like that in this wonderful book... although you do need to draw trees for the project I did... which is scary... but I managed :-)
Dancing in the Woods
Laugh if you will, but my teens and tween agree with me that this is one of the most romantic stories ever:
If you're at all into mixed media and have ever scratched your head wondering, how'd they do that? this is the book for you.
Plus there's also a lot of great practical stuff about juggling art and life as well as how art is great therapy. Going off my meds this week was bearable because the small steps in these projects kept me moving around and outside my head (My head is a bad place right now. All it does is scream all day long PAIN!!!PAIN!!!PAIN!!!)
Sorry to go on and on... my poor husband has barely heard a sentence from me that hasn't started with, "Pam Carriker says you should..."
This is my larger piece. The kids call her "BIG BABY" but the real title of the piece is,
Fairy Child in the Woods
Here's her quote:
This is the bit I'm most proud of. The photo copy of the child was a big white smooosh with a head and a hand sticking out. I used glaze and water-soluble pencils/crayons to add all that grey dimension to her dress and legs. She looks way more real with the pleats, creases, shadows and such. I don't think I've been as excited about a craft project in years! I employed the same technique, with less success on the dancers gowns to try to make sense of the washed out poufs and full skirts.
And here's how they're going to look up on our wall... probably *grin* You just never know around here.
The projects I made are designed by Brandie Butcher-Isley and found on page 37. If you visit Brandie's blog right now you'll see a very similar piece as the most recent post. She's SO cool!
I promise to post a lot of tips and tricks next week. Right now I'm just excited to share them with you.
(I think that the dancers are very romantic and the number of things I recycled on them is boundless. To name a few: junk mail, calendar, book pages, a bill, corrugated cardboard, and the board it's assembled onto is a leftover piece from an abandoned art project my youngest was doing a year or so ago.)
In reality they were okay. Like, I won't be posting the recipe because I don't want to hurt the feelings of the source... okay.
My family, unsurprisingly, gobbled them up gleefully. But in a house with a husband, two teenagers and a tween this isn't saying much.
Just so you know, I have baking fails from time to time. Here's a few of the problems with this batch:
They didn't rise! In fact I think they also fell.
Tops were big pancakes I had to cut them off with a paring knife to get the cakes out of the pan.
After all the fussing around with buttermilk, fresh brewed coffee etc. it tasted like boxed cake mix... not terribly substantial cake.
Boring!
So what's a girl to do?
Can't do much about not rising, but filling the cake helps. I made a franken-monstrosity of marshmallow, coffee, cinnamon and red pepper flakes and squeezed it into the middles. It bumped up their flavor and pooched out their little chocolate bellies making them less concave.
For their deflated muffin tops, I trimmed the cake flush with the liner using kitchen scissors. They looked surprisingly normal... considering. If you look at the pictures you can see the ragged edges, but I bet you didn't initially.
While the texture wasn't something I could work with short of squishing them into cake pops (and it's lightness stymied my plans to drizzle them with carmel for caramel macchiato flavored cupcakes), I was able to gain a lot of headway with the flavor by adding such a grown-up filling and making an intensely dark chocolate frosting. Instead of cream in my buttercream, I used a heaping tablespoon of instant coffee melted into two tablespoons of water. It sharpened the chocolate and gave them an additional delicious jolt.
To highlight the coffee, cinnamon and chocolate, I decorated the cupcakes with dark chocolate covered espresso beans and cinnamon hearts.
Now for the confession. Some of the poor cupcakes were utterly beyond saving and as a family we tend to shy away from mile high (corrective) frosting. So here is what they really looked like, sans blog photo styling:
Yeah... that could have gone better :-)
P.S. Anyone wondering what happened with potentially giving up the 52 Cakes Project as it makes our menu too cake-tastic? My sweetie made it one measly day before bemoaning the lack of cake in the house. LOL. Then he had to wait nearly a week for these ones. Apparently cake is here to stay.
So... health. It sort of sucks again causing me no end to the panic. I'm on week seven of a frightening down turn. It got bad enough that about five weeks ago I went back on my pain meds and that escalated quickly to quite the mess. This week I am back off them as my back pain and mobility issues seem to be equally bad with or without the meds, so why pollute my body with mind-numbing chemicals?
The timing really couldn't be worse though as I have a half-marathon and a week long vacation to Florida in nine days... and I'm flopping around like a fish in the bottom of a boat with back spasms, looking half-dead from lack of sleep and yelping from just walking across the room.
It's not pretty. But this time I have a plan.
(Kind of like Avery here - beating his brothers at a card game)
I'm going to slow down (even more... I'm feeling positively glacial at this point) and focus on these rascals, loving them, making sure the moments we have together are precious ones.
And maybe they'll remember this little blip as a time with good food and laughter
Instead of mom hiding in the bathroom crying.
The plan is to nourish, to be gentle and to get through it together.
To make pain au chocolat (the healthy way), prepare your favorite whole wheat bread dough allow it to rise once. Roll it out flat and cut into rectangles, then triangles. Roll up a chocolat baton in each. Alternatively you could add preserves, almond paste or even chocolate chips. Allow to rise (40 min), brush with an egg wash and sprinkle with sugar. Bake for 30 min or until golden.
Note: Some folks cut their dough in rectangles and put chocolate on each side and roll both ends towards the center like a scroll.
Once again it was time for me to make a LO using my page of the month kit from our LSS, Heartfelt Creations. The rules are to use everything in the kit, but nothing more. No paint, no stamping, nothing from your stash.
Here's what we got:
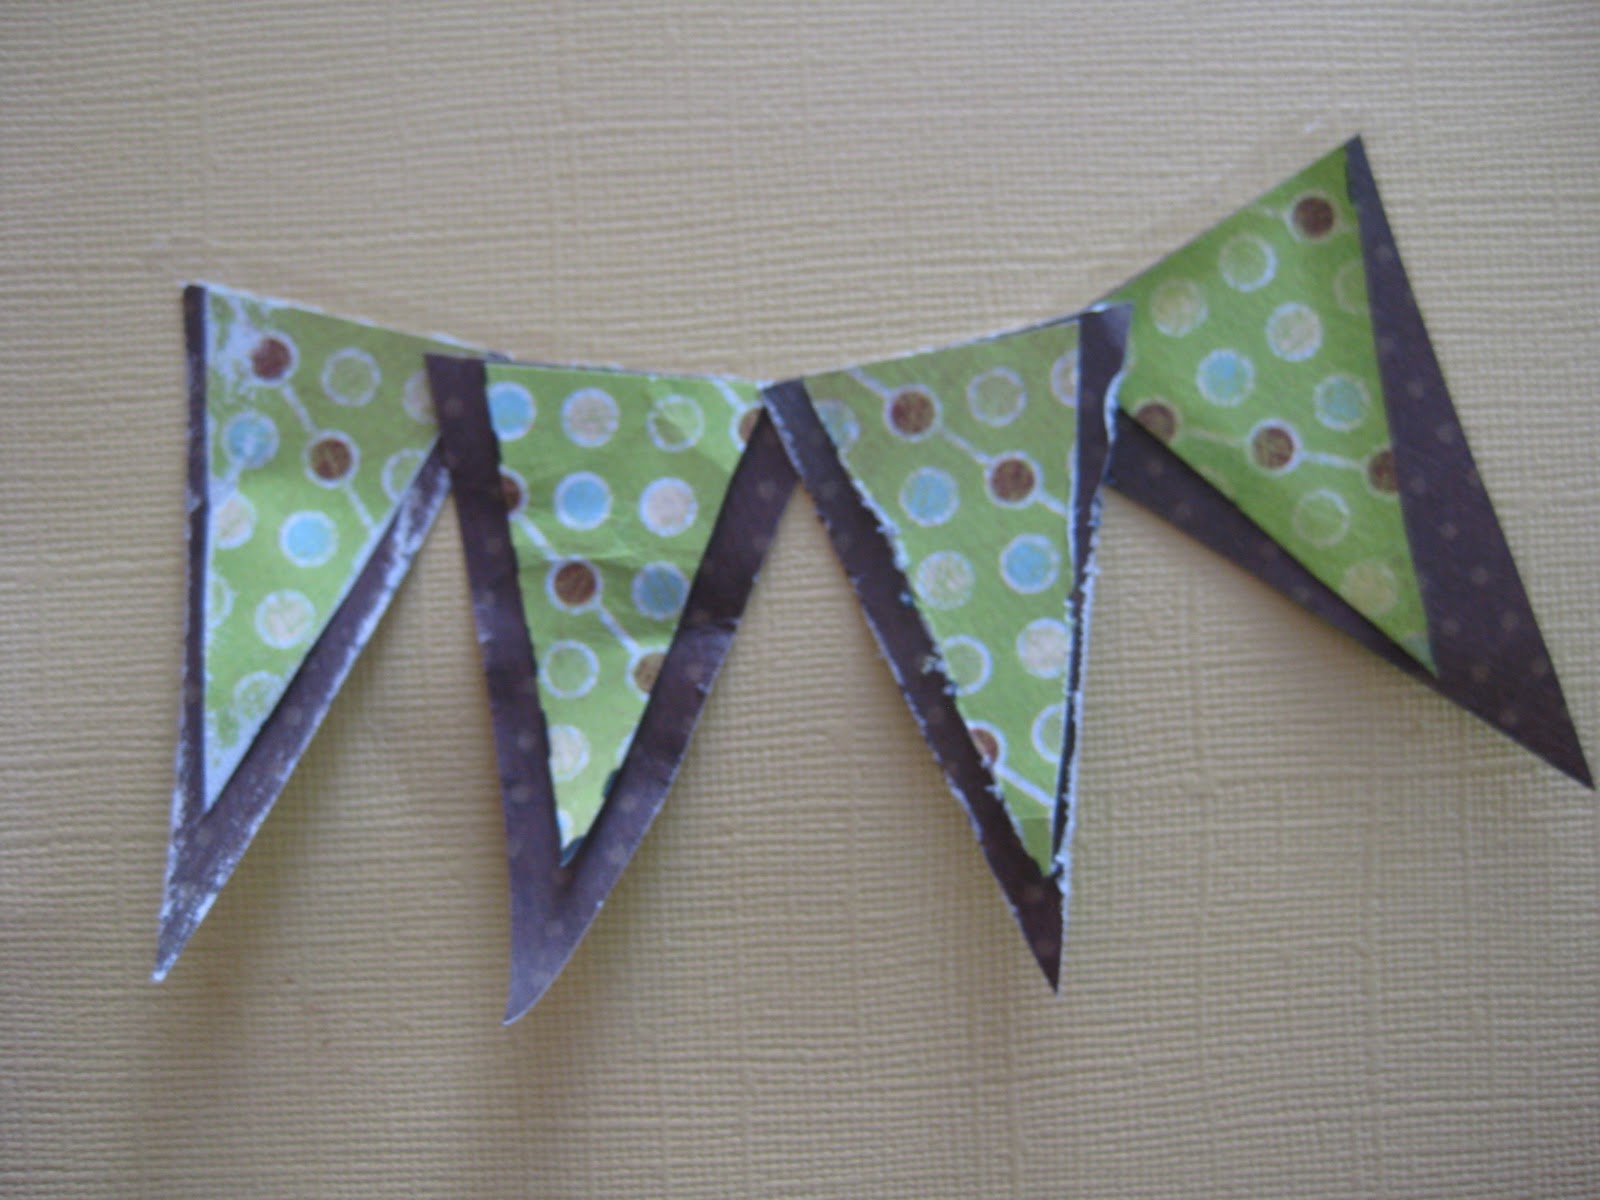
I really liked the double-sided paper that's green polka dots on the front and brown on the back. I wasn't such a fan of yellow cardstock - have you ever seen yellow on this blog??? - or the smooth blue cardstock. The whole point of joining this club was to challenge myself so I've really been loving every month so far.
As I've said before, the trick to making pages with few embellishments shine is to add visual interest with height and texture. The scalloped awning at the top was raised up with dimensional tape and the banner features lots of rough edges and curls to lift it off the page. Banners are very trendy right now so I thought I'd share the incredibly simple way I make them.
With this page, after cutting my mat, I had several long strips of paper leftover, lucky me!
Use a strip about as wide as you want your banner to be tall. Start by cutting an angled piece off one end of your strip. The marker is here for your benefit, don't draw a line, just cut.
Now you have this.
Cut as shown. Don't worry about them being even or perfect, imperfect seems to work better.
See how you this diagram shows five banners (not three)? Remember, you get twice as many as the number of cuts you make so stop when you have enough.
Now take the remaining piece of your strip and trim off a bit. What you're doing is creating a smaller pennant to be matted by the ones above. If you want a large border, cut off a larger strip.
Now repeat the cutting step. Your edge should already be angled so you don't need to repeat that.
Now stack them up. Have fun playing with the pairs for different looks.
At this point I like to distress and embellish my pennants. Here's a few simple ideas. I was constrained to the items in the kit but you could also add letters, jewels, buttons, rub ons, paint... sky's the limit.
Now to put it all together, make a smile with adhesive where you want your banner to go.
Attach your pieces making sure you overlap some of them and maintain a fairly smooth top line.
You might want to grab a cuppa and sit awhile. This post is packed with pictures.
Friday was our 16th anniversary and due to circumstances out of our control we weren't able to go out to our favorite restaurant as planned. I decided to go over-the-top romantic and make a really nice dinner and romantic environment at home. I didn't want to skimp, or break the bank, and you'd be amazed at how special you can make things with a few luxe details and what you have on hand.
My first priority was to make the area look different from everyday. I didn't want him glancing over at the sink and remembering it needs to be re-caulked. YKWIM? So I cordoned off the area with a tulle tent - sorta - enough at least to imply separation from everyday.
All I did was tie long pieces of tulle to an embroidery hoop and thumb-tack it to the ceiling. You can buy tulle spools that hold 50-100 meters of tulle. Mine cost about seven bucks and it had a huge amount of impact. Here's a not so great pic of how to do it. I promise, once the candles are lit, the scene is set and the dishes are done it looks fab.
To help it stay spread out, I ran a safety pin through the back side of the table cloth, grabbing the lengths of tulle and affixing them to the table corners. Then I took the ends and tied a big bow. With a little fluffing they looked fantastic and provided a nice nod to weddings.
See, pretty :-)
For the table, I bought red votives at an after Christmas sale - 12 for seventy-five cents. I knew with Valentine's Day etc. they would come in handy. Always check to make sure your candles are unscented if you plan on using them on your table. Scented ones compete with the smells and flavor of your meal.
All we have for fancy linens is these gold and purple ones from years ago. It really wasn't the color scheme I wanted to go with so I decided to lay them down as a base layer and add more interesting pink, red and white items to distract from their PURPLE! and GOLD! -ness.
Cinnamon hearts were a great "camouflage" , they were inexpensive, breath-freshening and had a confetti-meets-candy vibe that was also unabashedly romantic. We loved them and I loved the effect.
Texture and touchable elements add WOW to a table scape, so I filled in a lot of the space with gathered crepe streamers. I used most of a whole roll, $1.25, and it was well-worth the time it took. The technique is identical to the gathering steps of Crepe Paper Ornaments, although I stitched it directly off the roll and left the edges straight.
I added some inexpensive flowers in pink, white and mauve (trying to work with that purple). Cheaper flowers tend to look best clustered in low arrangements. I cut the stems short and crowded them into low glasses. The impact was greatly improved and we didn't have to crane our necks to see around taller displays.
The candelabra was from the head table at our wedding and the glass candle holders were a treasured wedding gift. I wanted to have the table be filled with memories from that time in our life so I printed out a photo booth picture we took a week or so before the wedding. It made the place settings a lot more personal and inspired lots of reminiscing.
Dinner required crusty bread for sopping up all the tomatoes and vegetables so I continued my theme with heart-shaped bread. To do this, make a long skinny baguette and form it into a heart. Use water to attach the ends and let it rise. When baked, the center of the heart fills in and you keep the shape.
Here's a quick video I made, candles lit, house tidy. Hope it captured the mood.
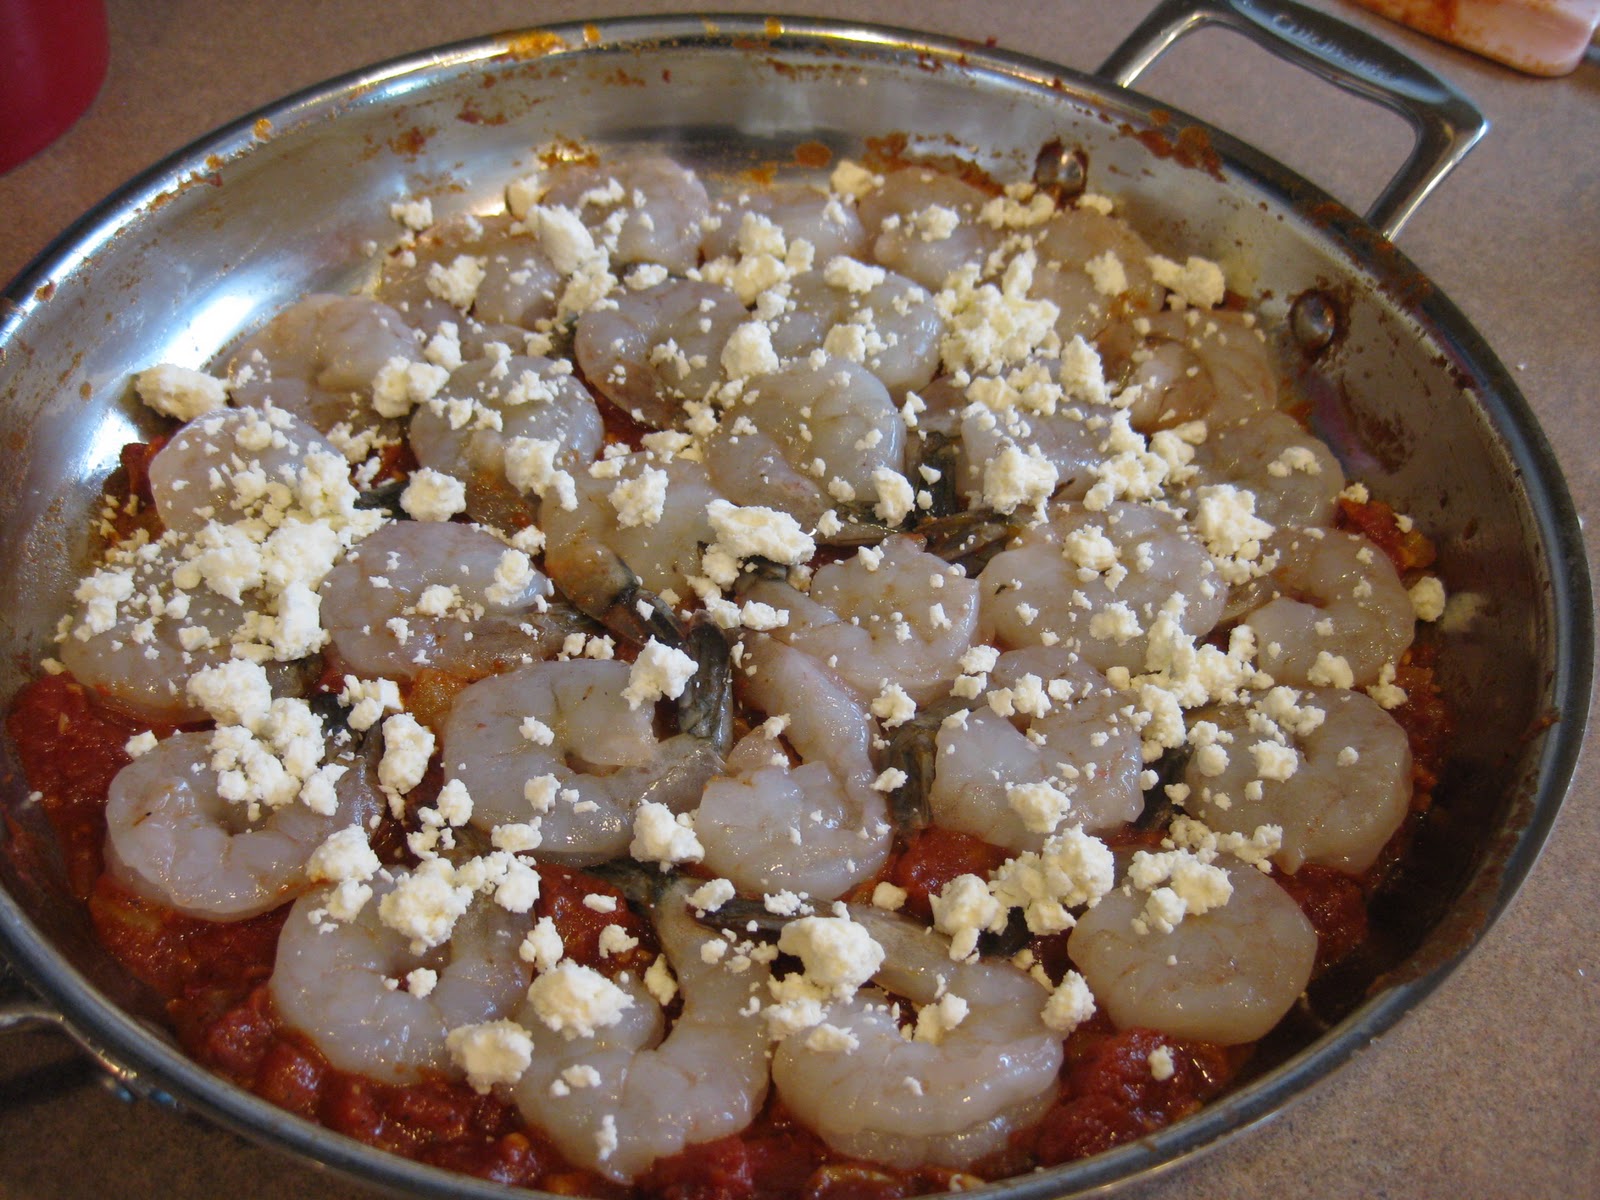
For dinner I made roasted shrimp and feta, the recipe is from Ina Garten's How Easy is That? cookbook. It's a marvelous resource and we can't wait to try everything in it. She's my cooking hero. The shrimp was the best we've eaten and had a real five star restaurant feel to it. I loved having the pan on the table so we could dip our bread in the sauce. Very casual and fancy at the same time.
ROASTED SHRIMP WITH FETA
Serves 4 (we thought it serves 6)
Good olive oil
1 1/2 cups diced fennel (1 bulb)
1 tablespoon minced garlic (3 cloves)
1/4 cup dry white wine
1 (14 1/2 ounce) can diced tomatoes, drained
2 teaspoons tomato paste
1 teaspoon dried oregano
1 tablespoon Pernod (I used Ouzo and it worked perfectly)
Kosher salt and freshly ground black pepper
1 1/4 pounds (16 to 18) shrimp, peeled and deveined with the tails left on
3-5 ounces feta cheese, preferably Greek or French, coarsely crumbled
1 cup fresh bread crumbs (see note)
3 tablespoons minced fresh parsley
1 teaspoon grated lemon zest
2 lemons
1. Preheat the oven to 400 degrees.
2. Heat 2 tablespoons of olive oil in 10- or 12-inch heavy ovenproof skillet over medium-low heat. Add the fennel and garlic and sauté for 8 to 10 minutes, until tender. Add the wine and bring to a boil, scraping up any browned bits clinging to the bottom of the skillet, and cook until the liquid is reduced by half, 2 to 3 minutes.
3. Add the tomatoes, tomato paste, oregano, Pernod, 1 teaspoon salt and 1/2 teaspoon pepper to the skillet. Simmer over low heat, stirring occasionally, for 10 to 15 minutes.
4. Arrange the shrimp artfully in one layer over the tomato mixture in the skillet.
Scatter feta evenly over the shrimp.
In a small bowl, combine the bread crumbs, parsley, and lemon zest with 2 tablespoons of olive oil and sprinkle evenly over the shrimp.
5. Bake the shrimp for about 15 minutes, until the shrimp are cooked through and the bread crumbs are golden brown. Squeeze the juice of 1 lemon over the shrimp. Serve hot with wedges of lemon.
NOTE: To make 1 cup of fresh bread crumbs, remove the crusts from 3 to 4 slices white bread and place in a food processor fitted with the steel blade and process until the bread is in crumbs.
Assemble the shrimp right in a 10- to 12-inch stainless-steel sauté pan, and then put the pan in the oven for 15 minutes before serving. This was a lifesaver for me as I could have everything ready and then pop it in the oven once Chris was home.
It was delicious!
For Dessert We had Saltine Toffee, Chris's favorite (mine too!)
Saltine Toffee
40-ish Saltine crackers, plus 1/2 cup crushed Saltines for garnish (about a sleeve and 1/2)
2 sticks butter
2 cups brown sugar
2 cups semi-sweet chocolate chips
Preheat oven to 350
Line your baking sheet (jelly roll pan) with foil and spray lightly with cooking spray.
Arrange your crackers snugly on baking sheet.
Over medium high heat melt butter and sugar together.
When mixture comes to a rolling boil let boil for 2 minutes, stirring.
Pour mixture over crackers.
Bake in oven for about 10 minutes. Toffee will be bubbling.
Let cool for 1 minute and then sprinkle chocolate chips on top.
Let sit for 2 minutes and then spread the melted chips with an off-set spatula.
Sprinkle with reserved crushed crackers.
Refrigerate pan for approx 30 minutes so chocolate and toffee sets.
Break or cut into pieces.
Store in an airtight container for up to 5 days.
With the mood set, all I need to add was a pretty dress, nice lingerie, high heels and some music.
Thanks so much for sticking it out through this very long post. Hope there are a few ideas that you can adapt to your situation.