Friday, May 25, 2012

Patriotic Memorial Day Gift Bag

This morning when I checked my email there was an incredible card made for the PTI Design Team Tips newsletter. While hers was absolutely perfect, I thought it might be fun to make my own quick and dirty version with Bombshell Stamps. This time of year, gift bags are always handy for taking to picnics and barbecues so I adapted the medallion/rosette idea to decorate a bag instead of a card.


I used the smaller supporting images from Retro Cowgirl - the barbwire made a "plaid" sort of background


and the stars from Love and Luck (blue) 


and Ahoy Sailor (black). For the paper I used lunch bags, some of which had been sprayed with blue ink ages ago.


The center of the rosette was a free digi from Bombshell stamps. I'll come back and link it up if I can find it again :-)

I think it'll be perfect this Memorial Day weekend and if not, 
there's always Fourth of July.


Huge thank you to all those in the military and their families. 
You sacrifice so much. 


Warmly,
                       Nicole

Friday, May 18, 2012

Cake #46: Biscoff Cake Bars


I've been hearing a lot of good things about Biscoff Spread
 all over the place so when I saw it at the grocery store I couldn't resist picking some up. What is it?

To quote Baking Bits
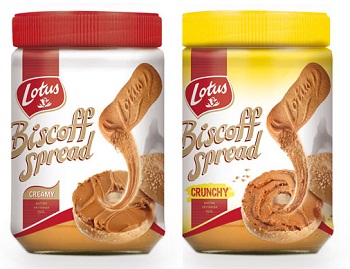
"Biscoff spread is a peanut butter-like spread made of speculoos cookies. Speculoos are buttery, brown sugar and spice-flavored cookies that are similar to gingersnaps and are popular in the Netherlands (and elsewhere). They’re traditionally served around the Christmas season. The spread is made of speculoos cookies (Biscoff brand, which are widely available) that are turned into a thick spread with the addition of sugar, vegetable oil and other all natural ingredients. The spread is smooth and creamy, with a deep brown sugar, butter and spice flavor to it. In other words, it is a spreadable cookie and it is delicious."

It was hard for me to imagine a spread made out of airplane cookies but one spoonful and I was hooked. It's smooth as can be and tastes like a cookie in spread form. It's amazing. And dangerous.

Suddenly the internet being awash in Biscoff recipes made perfect sense.

But I didn't feel like making another cupcake so I waited for something more inciting. Cue these
Gooey Biscoff Cake Bars  from over at I Love Pasta - they found the recipe at Plain Chicken... I'm not surprised this recipe gets around. It's a knock out.

On the CONS side of the ledger though you're mixing cookie spread (think nutella) with butter and sugar... it's RICH. And it'll make your house smell so good you'll forget all about swimsuit season. Trust me on this one.

I also liked how easy this was. While I usually don't  favor box cake doctoring, the yellow cake mix+butter+egg was an ideal crust and it set off the filling perfectly.


So let's get baking!

Biscoff Cake Bars

For the Cake:
1 box yellow cake mix
1 egg
1 stick butter, melted

Filling:
8 ounces cream cheese, softened
1 cup Biscoff Spread
3 eggs
1 teaspoon vanilla
1 stick butter, melted
16 ounces confectioners’ sugar

Directions:

Preheat the oven to 350 degrees F.

Combine the cake mix, 1 egg, and butter, then mix in the bowl of a stand mixer fitted with the paddle attachment. 


Press the batter into the bottom of a lightly greased 13×9 inch baking dish.


Make the filling next. In the bowl of a stand mixer fitted with a paddle attachment, beat the cream cheese and Biscoff Spread until smooth. Add the eggs, vanilla and butter, and continue beating. 


Add the confectioners’ sugar and mix well. 


Spread Biscoff mixture over the cake layer


 Bake for about 40 minutes. The center should still be gooey when it comes out of the oven. 


Let cool, then cut into squares


The flavor is out of this world. We immediately decided that it was the sort of recipe to save for something special - like Christmas - which isn't the kind of status I usually give a plain tan colored bar.

The cream cheese was really unrecognizable flavor-wise (so so says my son who hates cream cheese) it is more the base for a silky smooth, gooey, nuanced, brown sugary filling.

I cooked my bars longer then the recipe called for by about ten minutes and they were nicely set. I've since looked up this recipe elsewhere and see that most people's are very wet and gooey - mine have more structure than that and that works for our taste just fine.

These are highly recommended. I can see making them again and again - especially for an event where I can cut them in small pieces and surprise our guests with something so exquisite coming in such a drab and unassuming package.


Linked Up With:

Thursday, May 17, 2012

Paper and Fabric Art Quilt


For this assignment in our It's Sew Easy class we were shown how to make a paper art quilt featuring free-motion stitching and even more frightening - binding! Eek!


So I put it off... and off... and off. And then decided to quit being such a wimp and go for it.

To start I embellished tissue paper and lined paper with stamps and paint


Then I cut the tissue paper in squares and rectangles... ish. This isn't an exact sort of project.


Next I Mod Podged the tissue to my piece of batik fabric. I usually loathe batik but this one, to quote my kids, "looked like the sort of thing I'd make with paint and white fabric" so I went with it. 


I realized my piece was going to be HUGE so I trimmed it down a bit but followed the same Mod Podge steps with the spare strips so I had something to practice on.

And then, after all the glue had made a big old mess I placed my pieces in the bath tub to dry over night and then trimmed them into squared, usable bits including ATC sized cards.


If you recall my earlier post, I made these with the ATC-sized scraps:


Back to the topic at hand... I bound the scary art quilt and it really wasn't that big of a deal. I thought the mitered join of the binding strips was going to make me throw up with anxiety but beginner's luck saw me through. And Julie's instructions were excellent.


Trouble is... when all was said and done... (and maybe it was just the size...) I had made the worlds most time consuming placemat. Seriously. You'd want to place a plate on it if you saw it. Not good. I mean it was lovely, great colors and interesting... but so very, very placemat-like. 

So I printed a photo I had edited within an inch of it's life:


(Pretty, no? I went to Costco and photographed some of the bouquets. It was a cheap way to get some pretty images to play with.)

And then I sewed it onto the quilt to serve as a focal image.


I like this a lot better. It's certainly less like a placemat and once I frame it I think it might end up to be a pretty piece of art. That said, there's a fair-to-middling chance I'm going to seam rip that photo off of it, add a frayed, painted, textured mat of some sort and sew it back on. It looks kind of flat... and tidy. 

We can't have that!

What would you do?

Tuesday, May 8, 2012

Scrape that paint: Tags!


Just a quick pop-in to say hello!


I always scrape leftover paint, empty my brushes or flip over stencils onto manilla tags or into gessoed but  unused journal pages. While it doesn't look like it will ever amount to anything; in fact it goes a long way to creating the layers of color and texture - totally serendipitously - that we all love. 


And the cost to you is near nil.

When I stamp, I usually stamp an entire sheet of images and color them as needed, or all at once if it suits my mood. When the need for a gift tag arose, I grabbed a 'decorated' tag, a pre-colored stamped image and all I needed to add was some appropriate text.

My Stories from Shakespeare for Children book is perfect for interesting sentiments.


While the glue was drying I tied some hand-dyed seam binding through the top and it was ready to attach to a parcel.

For me, having painted tags, colored stamped images and seam binding on hand means I can get a gift or card together in no time at all.

Stamp Used: Stampotique's Uncle Buck (ROFLMBO)

Sunday, May 6, 2012

My Teeny Tiny Zakka Pen Case


This "pencil" case was the bane of my existence. Let's just say in addition to giving me a throbbing headache, I got better acquainted with my seam ripper then ever before. Lucky.

But, I'd vowed come hell or high-water to get it done before the deadline and here, at 10:30 PM Sunday night I've got it made.

The word I've heard most often about this design is "clever" and I wish I could use it too, but I was so turned around that by the time the case actually worked I couldn't tell you what I'd done to get myself there. Normally this would be my cue to make two or three more until I know it so well I can make one without instructions but I think I'm going to pass.


 It's cute and will corral my pens in my purse nicely but it's just too tiny to have much use beyond that. See, these are my embroidery scissors. It's itty bitty.


Let's not even mention pencils...


Onward to next (this?) Zakka Style Sew A Long week's project :-)


Update: The deadline was 11:59 PM EST and we're Mountain...GAH... I missed it. Oh well, I have a rocking pen case to console me.

P.S. If you want to make your own (even just to prove what an incompetent fool I am at this whole sewing gig) there is a TERRIFIC tutorial over at one of the other participants blog. CLICK HERE to visit  I Finally Have Time.

P.S.S. Thanks to my wonderful MIL for the fabric scraps. I told you I'd use them *wink*

P.P.S.S. Thanks to my awesome husband for getting me through the fold and flip steps. I know I'm not the most fun when I'm tearing my hair out.

Wednesday, May 2, 2012

Stampotique ATC Challenge with Paper Quilting


I've been working on a paper art quilt for my It's Sew Easy sewing class for a few weeks now. When I trimmed off the edges they were perfectly sized for ATCs.


Lucky for me, the Stampotique Designer's Challenge right now is to make some ATCs. 


And I did :-)


I wish the gold Lumiere paint showed better in these photos - it's pretty cool. And the batting and fabric give the ATCs a little heft which I quite like. 

Thanks so much for visiting.

Warmly,  
~~~Nicole

Tuesday, May 1, 2012

Coach (or Teacher) Gifts and Easy Recycled Tags


We wanted to do something nice for the boy's swim coaches and this was a huge hit. All the parents kept asking if it was someone's birthday and the coaches were thrilled! Yay!

 While it's a little bit expensive, we were giving one gift from two kids and really wanted them to know how much we appreciated their role in Avery and Brayden's life.


First we chose towels in colors that we thought suited them


as well as magazines based on their interests.

 
We also added some Twizzlers and sunscreen, both things will come in handy when lessons switch to the outdoor pools or when they're just hanging out enjoying the summer sun.

It was really fun personalizing each gift and taking a moment to think about each coach.

For ribbon I chose polka dots for girls and plain black for boys. Keeping it simple is always the better choice.

What we didn't have time for though was fancy crafting for the tags. So I went to my go-to technique of recycling packaging. If you don't have any packaging on hand, old calendar pages or scrapbook paper work just as well.


When I opened my Dina Wakely Stamps I remember thinking, " she did all the work for me" when I saw the awesome collaged insert. I kept them for later use. 

First you need to trim the packaging down to the part you want to keep. In this case, I let the focal image determine the size of the tag.


Ink the edges and attach to manilla tags.
Add the recipients name with a label maker.
Easy!


These seemed a little too simple but since we were running out the door, I wanted to add something but it had to be dry: no paint, no glue, no glitter... and unisex. What to do?

Free-motion stitching. I added a few looks in black thread and chain pieced them so I didn't even have to start and stop sewing. See - they're all connected.


Trim the threads and attach to your gifts.


Thanks to Rachel Berry for the idea - via Pinterest.