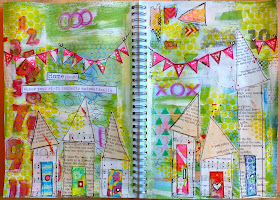
This past weekend we went on a road trip to Boise, ID.
I'd been commenting to my family about how my youngest is a much better artist than I am and how I attribute that, in part, to his practice of drawing in every spare minute. In the car, in bed, on his iPad, in line, at movies, watching TV... the kid draws non-stop. And he's always getting better.
I on the other hand tend to wait until the table is clean, I'm home, chores are done, supplies are laid out. See what I'm getting at?
So I tossed a handful of supplies into a gallon zip loc bag and decided to art journal while we drove.


Things I noticed:
1. It's not near as messy as you'd think. I dropped all my scraps at my feet and whenever we got gas I lifted out the floor mat and tapped off all the bits into a trash can.
2. Limited supplies aren't limiting. Not limiting at all really. I did a lot more art and a lot less deciding on which medium was perfect for the job.
3. A spray bottle of water is your best friend. Dirty brush? Lay it on your folded piece of paper towel (or a couple of napkins from lunch, or even a wad of TP) and spray it clean. Need to activate your water soluble crayons? Spray them. A 2 oz spray bottle is tiny enough to include but it packs a big punch.
5. I do this at home already but it bears mentioning, keep an envelope (mine is a waxed translucent kraft envelope usually for baked goods) with all the bits and pieces you've generated making stuff. For me, anything the size of a credit card or smaller goes into my envelope - gelli prints. stamped but unused images, quotes, wrapping paper, tissue, ephemera (like stamps), the last embellishment in a package... you name it. I also include a few sheets of (folded) book paper, dictionary pages and hymnal sheets so I have some large neutral bits to work with and some punchinella. This provides you a ton of colors and textures to use when you don't have access to your supplies - or you just don't want to haul them out.
6. Gelli prints, especially on deli paper, are the ultimate stand in for a rainbow of paint colors and an abundance of stencils. With scraps of gelli prints alone I was able to replicate the look of zillions of supplies - while driving down the interstate. I love simple things that look complicated.
7. Mod Podge, Matte Medium, Collage Pauge... pick one and bring it. Once my collages were 95% of the way there I pulled out my tiny bottle of decoupage medium and applied it to the pages by squeezing a little dab onto my finger and rubbing it into the page. I tend to get my hands in there anyway so this wasn't all that weird for me. But it was very controlled, not a drop landed where it was not intended, and the medium makes the deli paper 'melt' into the page so all you see is the painted patters. It also stuck down errant bits and edges as well as sealed the neo-colors so my black pen would write over them. Since you're rubbing in the glue you apply a very thin coat and it only took moments to dry. Which is a good opportunity to look out the window and enjoy the view a bit.
8. Don't worry about completing things. Get your background in, maybe do a little fleshing out of your focal image but don't stress. Each pages I made took only a few minutes to finish once I got home and most of that was adding a unifying paint color and some splatters. I was a lot more 'done' than I imagined at the time and not stressing too much about the final product took all the pressure off me while creating in the car.9. Don't forget your basics. For me that includes Cutter Bee scissors, gesso, Mod Podge, Neo colors, spray bottle, paint brush, black and white pen, paper towel and ephemera. Here's all I brought:
Thanks so much for stopping by :-)


Great journal spread, and the tips you give are super helpful for me when trying to figure out what to include in my own travel kit!
ReplyDeleteGreat tips, I'll have to remember this post for my trip to Seattle in August!
ReplyDeleteLove the quote... it makes me think of how many wifi passwords my hard drive contained by the end of a two-year journey. Home was everywhere. :)
ReplyDeleteLove your pages. I'm on "house" kick in my art journal right now so this caught my eye. I haven't posted any of my pages yet, but I will soon. Now I want to start adding some colour to some deli papers to have on hand. Thanks for the inspiration. :D
ReplyDeleteOh Nicole, what a fabulous post. Glad that you enjoyed your new experience. Simple is often the best option and your finished result is the proof. The spray bottle is a neat idea. Hope that the boy never tires of drawing. I also have a drawing boy,! Respect, Hazel x
ReplyDelete