Tuesday, November 29, 2011

I Made a Mug Rug


Mug Rug... not the nicest phrase, it conjures up images of toupees and mug shots. But I didn't name them, I only made one. 


At first, like so many others, I questioned the need for a quilted textile larger then a coaster but smaller then a placemat... don't we have something like that already? They're called pot holders! But it turns out the difference is that pot holders have a loop for hanging; mug rugs do not.


So now you know.

Here it is all frayed and fluffy after a trip through the wash. 

 Every since I watched a quilt show and an internationally acclaimed quilter left her batting showing (unbound) I've had a strict "good enough for her, good enough for me" policy on not binding a darn thing. I love the softness peeking out around the edges.


Thanks so much for all the enthusiasm you had towards my Advent for Older Kids idea. I'm thrilled that so many of you are trying something similar. Have fun.

P.S. Huge thanks to my friend Karen for the gorgeous fabric I used in this project.

Monday, November 28, 2011

Advent for Older Kids


I wanted to do something different with the boys for Advent this year. We usually fill a pocket calendar with little scrolls of activities to do each night. But that gets very tiring and expensive. It was great when I could put in a mini candy cane and they'd be thrilled but at 15, 14 and 13.7 their idea of special fun is a little more complex - paintball anyone?

The desire to use what we have instead of always buying 
more, more, MORE 
has been on my heart more than ever so I came up with this idea.

For advent this year, I've wrapped up the boys 24 most favorite games - this includes several wrapped decks of cards for whist, poker, speed, etc.


Each day of December one boy will pick a game and we'll all play it. This way we're spending time together which is much better then spending money and chasing entertainment.

Speaking of, this is a great video on the topic of giving of yourself and your time instead of just spending more and more $$$

Advent Conspiracy from International Justice Mission on Vimeo.

We're all a lot more excited about this year's advent then we've been in many years and as a bonus, the wrapped games are a nice festive decoration too. 


A similar idea for families with younger kids is to wrap up all their favorite story books and to read one each night.

Wednesday, November 23, 2011

Acorn Treats: Food Craft for Kids


Every year we make some sort of acorn treat this time of year. Mostly we've made these:


You take a donut hole, frost the top third, roll it in toffee bits and then stick a piece of pretzel in the top. They're delicious.

But I was a little tired of them and thought we'd make something different this year. I saw Hershey's Kiss acorns floating around the internet and we gave them a try.

You need melted chocolate chips, Nutter Butter  Bites, Hershey's kisses, butterscotch chips ( or PB chips) and a couple of toothpicks.


Pick up some chocolate with the wide end of a toothpick and glue together like this:


If you find the cookie is moving around too much let them sit a minute, cookie side down, before 'gluing' on the butterscotch chip. They set up really fast.


My kids loved making these and my husband LOVED eating them.


Happy Thanksgiving to those who are celebrating tomorrow :-)

Monday, November 21, 2011

Easy Step-By-Step Christmas Card


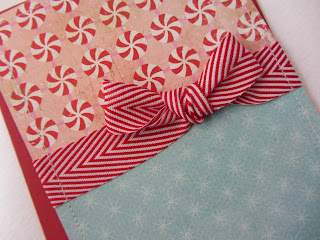
This card features many gorgeous goodies that came in the CupCards {to go} Holiday Kit. I broke it down step by step so you can see how it's made. Ornaments are a great way to use up brads, buttons and jewels from your stash.

Step One: Affix two different patterns as shown.


Step Two: Tie a Bow and attach ribbon over seam.


Step Three: Add green brad and ornament sticker. Attach jewels to sticker for added sparkle and dimension.


Step Four: Stick button onto a dimensional dot. Layer "love u" tag over top of tiny tag and affix to card with button. Be sure to line all this up directly above the bow so it looks like the bow is on the ornament. 


Step Five: Adhere card front to red card base.


Decorate Envelope to match if you'll be hand delivering your card.

Friday, November 18, 2011

Chocolate Chip Muffins


You know that recipe that you can whip up at a moments notice, is utterly stress-free and everyone in your family can make it. In our house it's these muffins.

My eldest who is stove-phobic will surprise us with a batch regularly, which really is saying something.

They're so common-place around here that I don't think I've ever blogged about them. Sorry!

 Chocolate Chip Muffins

2 C all-purpose flour
1/3 C light-brown sugar
1/3 C sugar
2 tsp baking powder
½ tsp salt
2/3 C milk
½ C butter -- melted and cooled
2 eggs - beaten
1 tsp vanilla
¾ C chocolate chips

Preheat oven to 400 and grease muffin pan.

In a large bowl, stir together flour, sugars, baking powder, and salt. In another bowl, stir together milk, eggs, butter, and vanilla until blended. Make a well in center of dry ingredients; add milk mixture and stir just to combine. Stir in chocolate chips.

Spoon batter into muffin cups; bake 15-20 minutes, or until a knife inserted in center of one muffin comes out clean.

Remove muffin tin to wire rack; cool 5 minutes and remove from tins to finish cooling.

Serve warm


Wednesday, November 16, 2011

Automatic Drawing: Portrait

I've been working in my sketchbook lately (love the 11x14 size) and tried out automatic drawing to create a self-portrait. I guess I should probably stop calling all these art experiments 'self-portraits' but I don't know another way to describe a piece that exposes who I really am inside. With crafts it's so easy to not share your self - you enter a challenge, do an assignment, complete a card for someone else. For me, with art, I strongly believe that the only unique thing I can bring to the table is me and how I see and filter the world around me. So the art needs to be an extension of who I am and the thoughts I have.


For this project I tried the draw and veil technique. You draw for a minute or two - just a short bit of time - and then you cover some of it up with paint, then you draw again and then you veil. It's mesmerizing watching the piece blossom and then be ruined only to blossom again. And the layers each hold a part of what was speaking to me when I made them. This is definitely a technique I plan to explore further.

Have you missed my baking? I've been baking up a storm but haven't posted because it's all been family requests for recipes I made earlier in the year. I couldn't really say, "nope. I'm only baking new recipes this year"so I've made very little progress on 52 cakes the past few weeks even thought my kitchen has been over run with pastries and goodies.

Avery asked for the Coconut Lime Cake for his birthday:


Great day. Great kid. Great Cake.


Pizza Rolls


I saw a recipe for Pizza 'cinnamon buns' at Savory Notes and I knew I had to take a crack at them, immediately. But, since I have a lot of favorite ways of doing things, I copied the idea but not the recipe. 

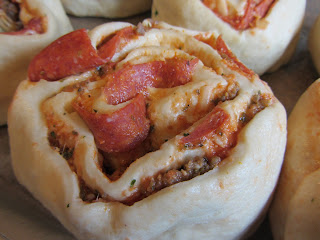
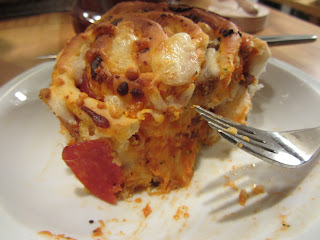
These were a major hit at our house and the twelve Cinnabon-sized rolls fed my family for a whole weekend. My bottomless-pit of a fifteen year old could only eat one. Crazy!

Basically this is what you do:


Need a bit more? Thought so.

First I made bread dough. I think bread was prefect as it's a lot fluffier then pizza dough. This recipe makes three large loaves so if you don't have a need for a massive amount of pizza rolls, mix this up and bake a loaf or two of bread alongside the pizza. Then you can have fresh french toast in the morning too. Yum!

Nicole's Best Bread in the Whole World
(nobody said I was humble)

2 pkgs of yeast (1TBL = 1 packet)
¼ C warm water
2 C warm milk
¾ C sugar
½ C softened butter
1 ½ tsp salt
2 eggs
7-8 C flour

Dissolve yeast in warm water. Add milk, sugar, butter, salt, cardamom, eggs, and 3 C of flour. 
Beat until smooth
Stir in enough remaining flour to make a soft dough
Knead 6-8 minutes
Place in greased bowl.  Cover. Allow to rise until doubled (one hour)
Punch down. Divide into three and form loaves.
Cover and rise until doubled (about 45 minutes


Bake at 350 degrees for 25-30 minutes or until golden brush top with butter as soon as it comes out of the oven for a nice buttery soft top.

Note: for Finn Bread or cinnamon rolls, add 3/4 tsp of cardamon when you add the salt. This recipe makes great rolls, sandwich bread and braids beautifully.

For pizza rolls

After kneading allow bread to rise until doubled, about one hour.
Spray your counter with cooking spray (Pam) so the dough doesn't stick when rolling it out.
Punch down and roll out the amount of dough you would like to use (all of it, 1/3 or 2/3s) onto your counter in a rectangle. It doesn't have to be perfect. I do this by squishing it out with my hand but use a roller if that's your thing.

Rub butter or margarine over the dough and sprinkle with garlic powder.

Spread a thin, even layer of spaghetti sauce (or homemade marinara) on top of the garlic butter layer.

Now you can top it with whatever you like. This is what we did:

Fresh grated parmesan, pepperoni, sage sausage, crumbled bacon, red pepper flakes, pizza seasoning.


Sprinkle a little bit of mozzarella over toppings. Remember, you're rolling this up like a cinnamon bun so don't go crazy.

Everything I know about rolling cinnamon buns came from watching Amish women from Pennsylvania do it. They're masters! The trick isn't to just roll it up like a towel; you need to roll and tuck, roll and tuck. Your fingers should be doing a little dance all the way up and down the roll turning and tucking as you go. It takes a bit longer but it works great. 

Now you should have a giant weird looking roll. Tuck the ends under if you're so inclined and cut it in half (short distance, not long) so it's easier to manage. Wrap each roll in Saran wrap and refrigerate for at least a half hour. This will help it all stick together and make cutting easier. When mine came out of the fridge a few hours later (I made this early afternoon and baked it for dinner) the Saran Wrap was TIGHT because it had risen so much. Don't be alarmed.

Unwrap and cut into slices. I made ours about two to three inches thick which produced HUGE pizza rolls. Cut them smaller if you want to make them more reasonably-sized. Use a sharp knife. Forget about the dental floss cutting trick because you're going through pepperoni. It just won't work.


Now you should have these.


Put them in a greased (cooking spray) 9x13 pan(s), cover and allow to rise for about 45 minutes.

Bake at 350 for 25-35 minutes. Sprinkle the top with some cheese for the last five minutes, broil if needed to melt the cheese.


I served them with bowls of marinara for dipping but two of my guys ate them 'dry', one loved the sauce and one dipped his in Ranch - all seemed like good options. 

These are delicious and microwave like a dream. I hope you try them.

Thursday, November 10, 2011

Full of Smiles: Tube Fun


When I saw the SRM mini tubes in the CupCards {to go} holiday kit, I let out a little squeal. They brought out the mad scientist in me, causing B. and I to debate which would be better, filling it with blood or poison... then we remembered that we're crafting Christmas so I headed a different direction.


 Are visions of sugar plums dancing in your head now?
They are in mine!

And see how cute the sticker on top is. Love! 


Making the tube holder was way easier then it looks. I followed this tutorial on Splitcoast Stampers and got it right the first time.

Don't feel like clicking through... here you go:


Thanks so much for stopping by!


Wednesday, November 9, 2011

Hard Day - Art Journal Sketch


I'm having a pretty significant flare-up right now and I thought I'd try to combine my current personal challenge of drawing faces with expressing how I'm feeling. This is not a self-portrait but a mood portrait, if that makes any sense.

I hope that unkempt, sad, a little scared and not on her A game came through in her expression and pose.

B. suggested I tinker with her as my mood and pain level changed to have a "living, ongoing expression of my physical state" (LOVE THAT KID! Who says stuff like that?) So I did and here are the results:


This was my first attempt using Pan Pastels and charcoal - neat stuff, very messy though.


I snapped these before journalling on the left hand side because it's personal and before I'm done probably won't be fit for sharing.


Sorry that this week has been all drawings, I have a lot to share (cards, DT assignments, bedroom remodel) but the pictures are in our main computer and walking across the room to it is too big a task right now. Please don't think I'm not going to be blogging all the stuff I normally do. I'm just banged up a bit and if it's not at arm's reach it's out of the question.

Would you all like a peek into B's sketch book? He's been surrounded by anatomy texts and working on skulls and torsos.

alien

chimpanzee


this one is trying to do an abstract face like I did for yesterday's post - it's also his first time using charcoal and he's totally hooked on the medium.

his own character

caucasian human