Thursday, January 26, 2012

Package It Pretty


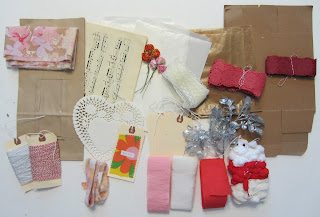
Earlier I shared what arrived in my Brown Paper Packaging Kit and today I wanted to show you a few of the things I've made with it so far. Let me just start by saying that using a kit the day I get it is pretty unheard of. But I was making some food for some neighbors in a very sad, scary, tough situation and I wanted my concern to come through loud and clear.

To start, I printed all the info related to the gifts on tags. To do this, print your text on regular printer paper, affix tags to paper over the printing and run it through again. The only hard part is remembering what side of the paper to feed into your printer. To help with this, I put a little x in the top left corner.


Then I decorated the tags with the torn fabric and flowers. Run a line of dry adhesive (like your ATG) across where you want your fabric to go and ruffle the strip as you place it down. Then sew over top for contrast and to tack it down.

For this one, I did two strips of ruffles and tucked the rose in the top.
Need the cinnamon syrup recipe? Here you go.

For the bread, fold waxed paper into thirds (long-wise) and wrap around your bread like a belly band, top with paper lace and tape together on the back side.. Add fabric of baker's twine.


Add your tag:


Nah... too cluttered. So I untied the tag and stapled it to the bag I slipped the bread into.

Repeat:


And keep repeating:


Until your gift is ready to be given:

(you can see the tag stapled to the brown bag in this pic)

I hope this post inspires you to take a few extra minutes next time you give a gift. 
It sends a message of loving care.

P.S. If you're interested, Bonita Rose posted about how I used her kit. Check it out and say hello from me.

Linked Up With:

Brown Paper Packages: Bonita Rose

My mom-in-law and Dad-in-law sent Chris and I birthday-birthday-anniversary money and I decided to use a portion of it to buy things from artists I admire and am inspired by.

One of those artists is Bonita Rose, she makes the most gorgeous stuff. She recently started a monthly club called Brown Paper Packages. Look:


Cool, eh?

I had no idea what to expect when my package arrived. First I opened up this:


And then I discovered ALL of this. WOW. What a deal.


This is totally up my alley. Here's a few gifts I wrapped at Christmas - do you see how the kit contents (which are very similar to what I had in December) can be used so easily and so well?


Glassine bag, tag, ribbon 


Doily stencil (sit stencil on lunch bag, spray with mist), bag and large accent 


Glassine bag, trim, tag

Here's some art by Bonita Rose, be sure to stop by and let her know how beautiful her work is:


She has a creative newsletter too.

P.S. I bought this kit with my own money and no prompting from anyone. I just wanted to share a great thing I found online in case you've missed it.

Tuesday, January 24, 2012

Photo Challenge Favorites

I've been participating in a photo challenge since December and I wanted to share a few of my favorite shots from the past few weeks.


Industrial park N. Salt Lake on a drizzly January morning.


Terrible Nutella filled crescent rolls. So bland and uninspired... but gorgeous! What a waste of all that homemade nutella!


We've been getting lots of snow. It makes our bushes so pretty.


I took oodles of pictures of our breakfasts all month and they were all boring. Oh look! A macro shot of oatmeal! I wanted something that told a story a bit more. This one is from today. I was baking muffins at 6:00 AM, coffee was brewing. I hope this photo captures the mood and industry.


This was the sunrise over our mountains. We were taking the boys to a swim meet very early in the morning and we had to pull over and attempt to capture the glory above us.


I've been making this Honey Whole Wheat Multi-grain Bread every day. Our freezer is finally full again and I love feeding my family all that 10 grain cereal and fresh ground wheat.


When I pulled out the bulk Valentine mix from Winco each of my boys, when they saw it, exclaimed, "That's my favorite!" We look forward to this the way most people look forward to Girl Scout Cookies or Starbucks Peppermint Mochas. It's so good.


This is about a two minute walk from our front porch. While I can't for the life of me capture how incredible it is to live in the mountains, I think this picture will give you an idea of what it's like.


It all starts with proofing the yeast...


Yeah... went a little nuts on the photo editing but it's pretty cool, right? Our house is the one at about ten o'clock.


There was a huge snow storm this weekend. We were very fortunate to follow a plow up the mountain. It made driving so much safer and less scary.

~~~

Thank you for the good wishes regarding my TOSH appointment. It was interesting. (Skip to the next paragraph if you're squeamish.) I had standing x-rays done and the two doctors we consulted both saw a serious structural, anatomical problem with my foot. My options are to have PT to repair the torn muscles and ligaments but to keep getting injured frequently and to not run or I can have my left foot restructured by cutting a wedge of bone out of my arch to lower it and then cutting my heel apart and putting it back in a slightly different position. After the recovery, I should be better than new and able to run again.

Scary!

So I'm going to do Bikram Yoga (my new obsession) and PT and see what sort of progress I can make on my own and take a good long time making my decision. This does explain why I've been 'falling off my feet' for as long as I can remember and why I wear out the sides of my shoes, not the bottoms.


Monday, January 23, 2012

Project Life Pages 1/9 -1/15


This was such a fun week to record. I realized that I branched out a bit with journalling cards and stitching  and I added a bunch of hand cut hearts from some painty tags I've been playing around with.


I also figured out that you don't need to put a 4x6 picture in a 4x6 space. You can put two 4x3 items in the pocket just the same. For some reason, this made the project a lot more fun.


Gotta run, I have an appointment at The Orthopedic Specialist Hospital (TOSH) today. How exciting! Maybe they can fix my eternally broken foot.


Friday, January 20, 2012

Mixed-Media Clutch


This is the next project I made for my mixed-media sewing class. I kind of love it. 


Instead of stressing about design, I copied Julie's 'alphabetica' pattern because I didn't want to get caught up in the creative side of things and lose my focus on the sewing. 


Being so casual with the paint and markers was actually relaxing. So glad I didn't make it harder then it needed to be.


For the lining, I used some gorgeous glittered (!!!) Day of the Dead fabric my mom-inlaw sent me. Love!!!


Pretty neat, no?


And it fits a Kindle plus wallet and keys perfectly. What more could a girl ask for?


Have a great weekend :-)

Wednesday, January 18, 2012

Strip Pieced Pillow


This is my second project I've been working on for my mixed-media sewing class. I got carried away making stamped fabric and then I didn't want to cut it up so I ended up with a wide center panel - which I love!


One of the hardest parts of making this pillow is that I like to recycle my pillows into pillow forms so they end up a little bit short of standard-sized and can be lumpy. But they're free and environmentally friendly. Plus my pillows take a serious beating - brand new or old.

To recycle a pillow into a pillow form, find a gross old pillow (we have a lot of flat, stained, drooled on pillows that I keep in a bin in the basement.  Shake the stuffing down into the pillow until it's more-or-less square. Then sew along the edge of where your pillow is now stuffed and unstuffed. I use a zig-zag stitch because it's going to be squished and pummeled a lot. 

Then I look at my pillow and using a ruler check to see how straight I sewed - usually not very straight at all. Since the stuffing is corralled in one side it's a lot easier to make a second row of straighter stitches to really secure it. Then cut off the excess pillow fabric and you should have a pillow form. Mine was really lumpy but it will settle with use.


For a simpler, flatter pillow you can simply shake your pillow as flat as possible and draw a line down the center (short side).  Sew about 1/4 - 1/2 inch on either side of your line and you should have two rectangular pillow forms. I did that for this one last year:


Here's a few more shots of my new pillow:


The back is an envelope fold - which is pretty cool. I've never tried one before.


And here it is in non-staged reality; getting some hard use from our Bubby.


Again, I can't say enough great things about Julie Balzer's workshops. If you have crafty education in your budget this year she's incredible.

Friday, January 13, 2012

Easy Turkey Dinner Meatloaf


Turkey Dinner Meatloaf is basically turkey and stuffing combined (YUM!!!) and it's one of my go-to meals - it's delicious, freezes well, takes advantage of modern conveniences and my family loves it. It's also a great recipe to try if you're interested in freezer meals but don't want to spend a whole day in the kitchen.

My recipe makes two meatloaves so you can enjoy one for dinner and then have a second dinner waiting  in the freezer. 

Ingredients:

About 3 pounds of ground turkey. The packages I buy are around 1.3lbs and I use two of them. This is a ballpark figure, don't stress about it.
1 box of chicken flavored stuffing mix. Stove-top or generic are fine. You don't need to bust out home made bakery-fresh bread cubes.
1 roll of sage sausage
3-4 ribs of celery 
1 medium onion, chopped fairly small
(optional) a dash of poultry seasoning or sage

That's it.


In a frying pan, brown your sage sausage. When sausage is about half-cooked, add your chopped celery and onion. I like to add the celery leaves too, minced. Add a sprinkle of spices if you're using them. It's very optional and tastes great without them.

Continue cooking until onions and celery are tender and sausage is fully cooked and lightly browned. Remove from heat.


Put the turkey in a big bowl.


Add the slightly cooled sausage and vegetables.


Combine well. 

Prepare two 9x13 pans. Spray one with cooking spray and line the other with foil. Then spray the foil with cooking spray.


Form your loaves, one in each pan.


Fold the foil up from the pan around the loaf. Try not to change the shape of the loaf because right now, as formed, it fits perfectly in your pan. You'll thank me later.

Add a second layer of foil and write the name of the food and the date. This doesn't seem important now but I've gone to unwrap a frozen meatloaf and found a calzone instead... which isn't near as good with mashed potatoes.


When you're ready to cook the frozen one just thaw and place it in your prepared 9x13 pan. 


Brush top with a little  olive oil and bake at 350 degrees for about 40 minutes. Use a thermometer to test for doneness. I usually cover mine for the first 30 minutes or so. 

Serving suggestions: 

Cut up potatoes in cubes, toss with olive oil, salt and spices and cook them alongside the meatloaf. This is great! So delicious. Serve with gravy.

Slice meatloaf onto soft bread for an open-face sandwich. Top with gravy and serve with fries and coleslaw.

Have a proper Sunday Dinner and serve with biscuits, mashed potatoes corn or green beans and cranberry sauce.

Chop leftovers into cubes and make hash.

Cook meatloaf in muffin tins for portion control and 'fun factor'; remember to cut the cooking time down to 25-30 minutes. Saves time and calories.

I hope you try this recipe. It's delicious and a favorite of ours.


Linked up with: