Friday, December 10, 2010

Local Scrapbook Club

Our LSS has a page club where you get a bag of product and make a LO with only the stuff in the bag using at least a little of every item.  You can't add anything else but pictures. Inking the edges is fine but stamping, painting etc. is prohibited. This one was tricky as the papers weren't my style, and I rarely use printed titles.


But, in the end, it came out okay. I really loved the challenge.

Here's a close-up:

Close up

And this is what I had left after my page was complete:

Scraps

If you're ever in Utah, Heartfelt Creations is an awesome store filled with crafting and quilting goodness. You should definitely pop in.

Wednesday, December 8, 2010

Crepe Paper Ornaments

Crepe Ornament
Please click on the photos to see them up close.

Hey Everyone, ready for Christmas?

When I saw Juliet Marsh's ornaments made from crepe streamers in the December issue of Cloth Paper Scissors I just had to give them a try. I have to warn you in advance, they aren't simple and they're really addictive you just want to make more and more and more of the things. I made a couple of minor adjustments to her directions to suit my own way of doing things. 

In Progress

(See. I meant a lot!)

Here's what you need:
Supplies

Cut your streamers into five foot lengths and trim one of the long edges with decorative scissors. I found this worked best if I folded the crepe up into about a foot-long piece :
Step One- Streamers and Thread

Whip Stitch the long, straight edge:
Whipstitch Crepe

I like to load the needle as it seems to support the delicate crepe better:
load the needle

You'll end up with something like this - pretty:
Stitched

Un-twist your crepe snake and pull the thread until you get a circle. This is tricky, don't hulk out and pull your knot right through the whole thing. Did it. Don't recommend it. Take your time on this step.
Pull into circle

Tie a Knot to secure your thread. Don't stress about this step, there is more securing coming up:
Tie a Knot

See, all gathered and knotted. You may need to squish and flatten it a bit to get it to look right.
Gathered and Knotted

Get out your Podge (or glue of choice):
Get out your Podge

And brush glue around the center gathers. This gives your ornament a lot more structure and support. Now it won't come apart. Yay!
Glue it up!

Gently spray some glimmer mist or whatever spritzable dye you use on your ornament. Don't forget this stuff is basically toilet paper weight and we all know what happens when you mix TP and fluids. Don't use much spray. Hold your hand far away. A little is plenty!
Spray carefully with color mist

Let your ornament dry completely. It really doesn't take long at all. I promise. 

Brush the face of your ornament with a little Mod Podge. Don't stress about covering it all or being perfect. Just slap a little bit on:
Dry completely then brush with Mod Podge

Sprinkle with glitter:
Sprinkle with glitter

Now do the sides:
Now do the sides

Glitter and Shake! Shake! Shake!
Shake it out

Instead of clear glitter, you can go monochromatic:
Monochromatic

or contrasting
Contrast

Allow to dry. Thread a ribbon through the center:
run ribbon through hole

Tie a Knot or bow. I use a knot if I'm hiding it in the hole for a "clean" looking hanger. I use a bow if I want a pouf at the top:
Tie a Knot or bow

Add a tag, journaling spot or decoration to the center and you're done:
On a tree

Pink Ornament

These are great for packaging treats:
Packaging

or you can hang them in a window to showcase their gorgeous translucent qualities.
Shining Through

I plan to make some graffiti, Bombshell, Day of the Dead, absolutely, positively me-esque ornaments in the coming days and I'll post them here. All of these tags feature journal spots from Elle's Studio.

P.S. I have this rule that I have to make one project for each magazine I keep so expect to see a lot of "inspired by" posts in the near future.

Linked up to:


Friday, November 19, 2010

Boy Loves Dog: Breaking All the Rules

(click to enlarge)

Just call me a rule breaker. I made a boy page in hot pink using Christmas paper... yep, Christmas Paper!!! on a layout that has nothing to do with the holidays. Did you see the jewels? Threw some of those in too because when  living life on the edge, pushing the envelope is as easy as breathing.

ROFLMBO

First of all, when looking at the color wheel, the best color to match those awesome jammies was hot pink. And I love Echo Park's Everybody Loves Christmas line and hate the thought of hiding it away most of the year. The rest as they say is history.

This LO reminds me so much of Brayden, he's unconventional, bright (sometimes bordering on loud), sparkly, energetic, a frenzy of fun - it just fit.

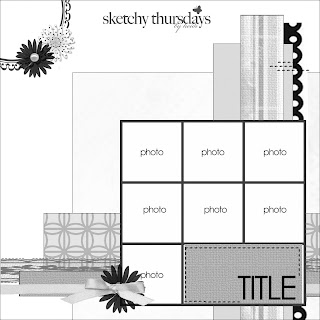
I used the current sketch from the always awesome Sketchy Thursdays:


This is also my entry for the Scrapbooker's Anonymous November Challenge to use holiday paper on a non-holiday LO:

Photobucket

Speaking of Christmas, are you ready for Thanksgiving or the holidays ahead?

Personally, I'm feeling a little ambivalent about the whole thing. I know, bad mama. Bad blogger. It's just not exciting me like other years have.

Thursday, November 18, 2010

Sketchy Thursdays

When I saw this sketch at Sketchy Thursdays I immediately thought I am not near clever enough to swing it. It just looked so darn hard. Like a really intricate quilt block... Dresden Plate perhaps.


Then the part of my that gets my back up at the very thought of, "too hard" decided I had to drop everything and give it a try. No surprises there.

Since I was still basking in the glow of a truly awesome visit with Tiffany and family I decided to take my very imperfect photos (it's been SO DARK here) of their stay and make a LO.

The rules were:

1. Be based on the sketch above (done!)
2. Include at least 5 pictures (got it!)
3. Include a bit of sparkle (red sparklies!)

(click to see it full size)

Again, sorry for the dark and angled picture. It's the best I could swing with no sun and heavy winds. Oy! How much fun is the new Circa 1934 paper from Cosmo Cricket? 

Here's a few close-ups:


Thanks for popping by :-)

Don't forget to pop by Tiff's blog, you could win some of my wrinkle ribbon, a $100 GC to Two Peas and a lot more from the different guest bloggers.

Wednesday, November 17, 2010

Chocolate Pecan Pie - Pie Week

Just popping in to say hello. We're having a wonderful time with the Johnson family. I've been trying to tempt them to stay in Utah with pie. Pie is good, right?


Chocolate Pecan Tart
1 piecrust
1 C chocolate chips
1 C chopped pecans
¼ C margarine
½ C packed light brown sugar
¾ C dark corn syrup
3 eggs
1 t vanilla
Preheat oven to 350 degrees
Fit the piecrust in your pan.
Sprinkle choc chips & nuts over bottom.
Melt butter.
Beat in brown sugar, corn syrup, eggs & vanilla until smooth.
Bake on lower 1/3 of oven for 30 min.
Cool on rack. Serve with whip cream.

Don't forget to pop by Tiff's blog, you could win some of my wrinkle ribbon, a $100 GC to Two Peas and a lot more from the different guest bloggers.

Monday, November 15, 2010

Guest Blogging at I Heart Art


I'm blogging today over at Tiff's I Heart Art. It's all about avoiding packaging panic.
Go check it out.


Tiff is so sweet, she's offering a $100 GC to Two Peas! Wow! To have a chance to win you need to comment on each of the guest posts. Easy as pie :-)

To get to my post directly CLICK HERE.

Thursday, November 11, 2010

For Veteran's Day

(click on photo to see it up close)

Today I stand with people all over the world in silent thanks and to pay my respects to the brave men and women who sacrifice their time, their families and their lives to keep us all safe from harm.


This piece is dedicated to each and every one of them. 


You can see how this calaca was made on my post here.