Showing posts with label Christmas. Show all posts

Thursday, November 5, 2015

MAKE IT MONDAY #229: FABRIC STRIP CHRISTMAS TREES

The Capture the Moment blog has the cutest fabric strip tree card for this week's Make it Monday Challenge. I couldn't resist making one.


Of course my colors are a little non-traditional... no surprises there :-)


Click to see it all big and pretty.


Friday, December 5, 2014

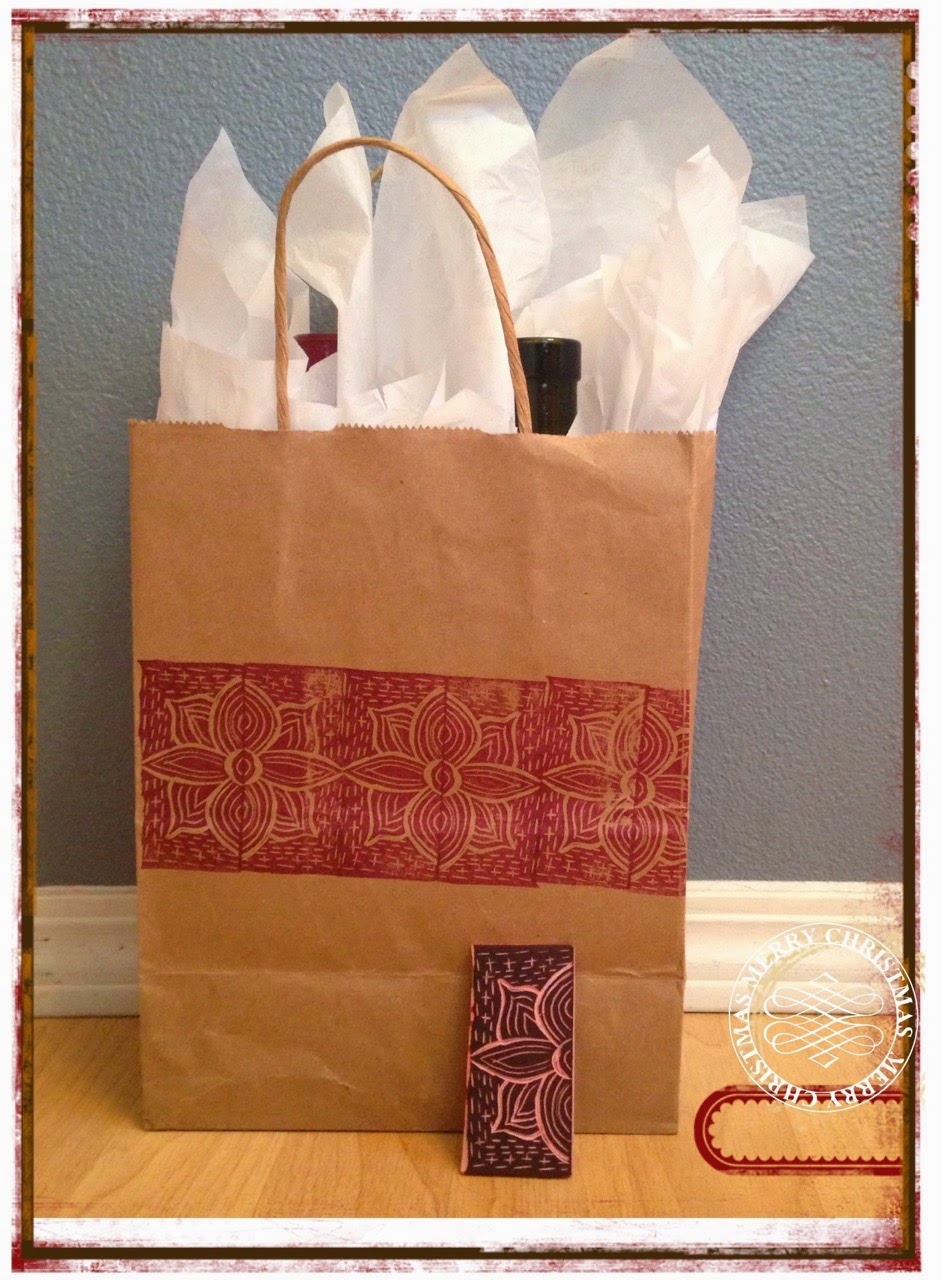
Mirrored Tile Stamp Christmas Gift Bag


Today is going to have to be a super-quick post as we're having a Christmas party tomorrow and I've done nothing. House is a mess, tree is not decorated. Food is neither cooked or even shopped for. 

EEK!

But #CarveDecember comes first so here you go.


Thursday, December 4, 2014

Hand Carved Deer Stamp and Stencil


Day Four of #CarveDecember... where is Day 3 you ask? Not posted but I did carve two stamps. I promise!

This stamp was inspired by Jennifer McGuire's GORGEOUS project for 12 Tags of Christmas with a Feminine Twist on Ellen Hutson. She layered a texture stencil underneath a deer stencil and made a patterned deer. It was so pretty I had to make one. But I do not have a deer stencil. What's a girl to do?

First I drew a deer. The first one looked like a deer-dog so I traced it on a light table (it was 6:00 AM - no taping it to the window for me) and when I got to the neck I moved my drawing up a few squares and lengthened it a bit. The difference between a deer, a dog and a giraffe is proportion. 

Side Note: If you ever want to try drawing cute animals (or plants, or people), I can't say enough positive things about the Illustration School series by Sachiko Umoto. I have three of the books and use them all the time. 


Then I started carving. I love carving early in the morning. 
My hand is so much lighter and I make fewer mistakes.


Once I was satisfied with how the lines looked, I stamped it in Timber Staz-On onto two cream panels of card stock and onto a green one. Using an exacto knife, I carefully cut out the deer where I wanted to add color to the image.

Often I'll make a second solid stamp to fill in the color (like here) but since it was a really large stamp, making a stencil was a lot more cost effective.

The steps below: 
Tape down stamped card. 
Tape stencil over top, lining up image. 
Apply distress ink (antique linen, tea dye and walnut). 

The last picture is the same thing but I sandwiched a second stencil between the deer stencil and the cardstock.


And the results - I have two cards (all I added was some glittery gold washi tape and a bow) a stencil and a stamp. 

Also, for a stamp this size I mounted it onE-Z Mount Cling Foam backing. It's just too large it use without an acrylic block.


Thanks for visiting!


Sunday, November 30, 2014

Beer Advent for My Husband


It's a Christmas Beeracle!


Beer Advent. Yeah, not exactly orthodox but huge points on the 'love one another' scale :-)

To make this, I went to a local taproom that sold individual bottles and cans of beer. I picked out 25 (Yes, the 25th is Christmas, but I thought he'd like a beer that day too.) The beers are all different and they run the gamut from pale German lagers to thick, rich stouts. Yum!


For decorating, I wrapped each one up in kraft paper, used washi tape for color and stamped the numbers on each one.

Tip: If you don't want to micromanage your beer choices, wrap first and then number. It was a huge bonus to me not to speculate on if porter is a Thursday kind of beverage. 

You can simplify this by buying four favorite six packs or even two cases. 

I bought some very fancy beers and the whole thing came to $64. Had I gone with six packs it would have been half that - about $32. 

Monday, January 6, 2014

Christmas Thank You Cards


Hello Everyone. My computer has been on the fritz and then in the shop for most of the last four weeks and it's so good to be back. I could not figure out how to blog with my phone. I don't know how some of you do it. 
I have a ton-o-backlog on things to share but first I thought I'd start with Christmas Thank You cards as we all probably need them right now. I haven't sent mine but today is the 12th Day of Christmas so I don't consider them late… yet.
I've never made Christmas thank you cards with festive holiday paper… it just seemed odd.  Christmas is over.  But it's already strewn about  and making a mess of your crafty space and it kinda works so… 
Over on the MishMash blog I saw that Michelle had added a typed sentiment under a "Winter Wishes" element that said, "and I hope you feel better soon." Which was brilliant. So I grabbed my dribs and drabs left over from the holidays and added little thank you addendums to them. Love!


***

I thought I'd share this not-very-sexy but motivating health thing I'm doing. When it comes to eating right, I prefer to look at my week instead of any given day. That way you don't have to panic if you have a nutritionally questionable dinner on Monday since you might have a powerhouse veggie soup on Tuesday. 

A lot of food theory stresses the importance of variety in your diet and it's something we're focusing on. I jot down what whole foods we eat and try to make sure each of those columns are lengthy. This is last week. We're still coming off of Christmas junk food so I know we can do better but it's not bad. 
 
What I love is that it's easy to see we were pretty skimpy on the fruit (lots of veggies though) and legumes so this week I'll make sure to add some into the menu. It's a terrific system.

As this is our second week I made one small change; I separated whole grains and starches into two categories. Our goal would be to have the 'whole grains' list exceed the 'starches' one.


I'd love to hear how you are mindful to keep variety in your diet and if you send thank you notes for Christmas presents.

Warmly,
~~~Nicole 


Thursday, December 12, 2013

Nosegays or Tussies

I took some time off from stressing about my endlessly breaking appliances and made some nosegays (or tussies depending on what era you're from) which I think will be adorable gift card holders or perfect neighbor gifts when filled with chocolates or other treats.
My appliances hate me. Last week our dishwasher broke and our fridge door shelf broke. We fixed the dishwasher and are waiting on the shelf to come in when we had a mini-flood in our kitchen. I opened the cupboard under the sink and saw this:

Um… not good. So this morning a plumber was re-piping our sink (sorry, I don't know plumbing vernacular well enough to say that correctly) while insulation dudes were spraying insulation in our attic, while my kids were homeschooling and my work-from-home husband with a co-worker who flew in from CO and was working from our home tried to do a video conference call, in my dining room, to Buenos Aires. Are you sensing the frantic nature of  my life.  Did I mention that all the while my dog, sensing we were under attack, was barking and crying like a banshee? 

Okay, back to nosegays… and peaceful Christmas cheer :-)

Can you believe they start with plastic dollar store Christmas trees? 


This is another project from SPARK your Christmas and I can see using it for many holidays beyond Christmas, can you just imagine how cute they'd be for Valentine's Day or Easter?

Tuesday, December 3, 2013

Crafting Christmas Decor

I've been crafting up a storm for Margie's SPARK Your Holidays class. It was so awesome and a great value. She really packs her classes with content and next to no filler. I love that lady!


This is my Junque Garland. So much color! 


And I made these deer heads on top of some backgrounds I'd made last month.


Here's how it looks all together:


And here's the garland being used on the table I set up for a local craft fair:


We also made these adorable table top trees: 


Here it is (in daylight), gracing my side table in our front room.


Have you been crafting your holiday decor?


Friday, October 25, 2013

Papertrey October Blog Hop Challenge


Papertrey Ink is having a blog hop! The challenge is to make a set of five Christmas tags :
Before you know it, all of the gift giving that goes hand-in-hand with the upcoming holidays will be here.  This month we thought we would challenge you to get a head start and create a quick set of five gift tags.  They can be as simple or as complex as you wish, but be sure to make at least five! 
Here are mine, I made them using PTI card stock that I cut with my half and half die collection.

click to see this full-sized

I ran them through my Cuttlebug with a striped embossing folder (sorry, can't recall the name of it) and stamped the top detail in Pure Poppy using the coordinating  Half and Half stamp.


Across the bottom I added some polka dot washi tape and a little row of jewels. I've had these Heidi Swapp jewel strips for eight years and they were still sticky. Color me impressed!


For the sentiment, I die cut and stamped the flourish from Boutique Borders: Thanks Mini Stamp set and then added the phrases from that set and from the Winter Hills set.
To finish things off, I added a shabby fabric flower and polka dot ribbon which I affixed with my tiny attacher. 
These will sure come in handy in the months to come. 
Thanks so much for stopping by.
Warmly,
~~~Nicole


Friday, January 4, 2013

Ornament Wreath: Clearance Aisle Crafting


You know I love lots of bold beautiful color so when I saw all the ornaments on clearance for 70% off I couldn't resist making an ornament wreath.

Since this is far from a new or original craft I'll just post a couple of notes. 

I made mine on a wire wreath form. You can get a large one at Michaels for about $1.99 - which amazes me as I didn't even know they existed until recently. 


You need ornaments - the filler kind are great. Be sure to have a selection of small ornaments to fill in blank spaces. A variety of sizes is nice too but not essential. And you'll probably use a whole lot more than you thought you would.


And you need some sort of garland. I loved this multi-colored garland but any will do. It seems silly as you're going to cover it all up but it fills in tiny spaces perfectly.

Here's a picture of the back of the wreath that pretty much tells the whole story


1. Wrap your wire form in garland. 
2. Hot glue large ornaments on first
3. Fill in spaces with medium and then small ornaments

Tip: Once I was done I spent a moment hot gluing the ornaments to each other where they touched. My wreath went from precarious to sturdy in minutes. Which is good as we're all pretty klutzy around here.

And here's a close up so you can see the layers, garland etc.


Thanks so much for visiting. I hope this inspires you to check out those grody looking end of Christmas clearance aisles. Ours was really picked over and I was still able to make this HUGE wreath for under ten bucks and I think it looks terrific.