Showing posts with label hand-carved stamp. Show all posts

Friday, March 13, 2015

Butterfly Tag with Hand Carved Stamp


Playing along with the March 12 Tags of 2015 by Tim Holtz and I got to use a stamp I just carved this week.


I was on the fence about making it (I'm so busy right now with art deadlines I wasn't sure I could spare the time) but then I saw Corrie's absolutely gorgeous version of the tag and I couldn't resist.


Have a great weekend!


Monday, February 2, 2015

#28Patterns


Julie's done it again. She has a terrific way of motivating people to make lots of art; first with her #CarveDecember and now with #28Patterns.


I started this one by carving a lemon stamp and fill stamp.


Then I stamped in Staz-On for the edge and Ranger Squeezed Lemonade Distress ink for the fill. Then I went over the whole thing, adding some green shadow and bright yellow highlights with neocolors.


And lastly I added the stamp to my bullet journal where I'm indexing my patterns. I've left my options open so that I can either just do a pattern in the journal or make something more elaborate and record it here. 


Friday, January 30, 2015

Mixed Media Bulk Valentines Day Cards


Hello Everyone! This is my 1000th post! I almost missed it. LOL

Since it's a milestone I thought I'd share a tutorial for bulk Valentines Day cards. This way if you're inspired you'll have plenty of time to make and send them. 

I made mine with a hand-carved stamp, but any heart-shaped stamp will do. This works for any shape really, but V-Day is all about the hearts. 

Indulge me as I show you the whole process, just ignore the bits that don't apply or roll your eyes a bunch and say, "duh!"

This is my drawing transferred onto a piece of Speedy-Carve. To transfer to rubber all you do is lay the front (pencil side) of your drawing onto the rubber and burnish with a spoon, pen lid, your finger... until it transfers. Which is pretty much immediately.

This symbol has been haunting my dreams lately. Don't know why but I'm following the trail to see where it leads. 

Carve your stamp.

As soon as I finish a hand-carved stamp, I usually stamp it a few times in my art journals. It serves as a nice record of what I made as I frequently give stamps away. You can see I made a stencil too (orange, mid- left)

But let's get to the Valentines, shall we.


Supplies (loose suggestions, this is mixed-media after all)

  1.  Watercolor - mine are liquid as I use them to make spray ink, but pans work just the same.
  2.  Stamp, Staz-on ink
  3.  Heat tool
  4.  Paper towel
  5.  Water, brushes
  6.  Watercolor paper, cut or torn to desired size.
  7.  Map or book paper (I used both)
  8.  Adhesive (Mod Podge)
  9.  Gold Paint


Step One: Create your watercolor backgrounds.
1. Add water with a brush where you want your paint to spread. It will only move around the wet area. This is a wonderful quality that allows you to blend colors or keep them separate.
2. Dab paint into the wet area
3. Paint spreads (or you help it a bit with your brush)
4. Repeat with new color (orange) having some parts mingle and some not.
5. To soften the color roll over card with paper towel
6. Keep adding colors until satisfied.

Note: At any point you can use your heat tool to dry an area so the paint won't spread into it. 

Once you've painted your background, take a clean brush and flick water all over it. Wait a few seconds and then roll over the card with your paper towel. It will lift off the paint and leave pretty lightened areas. 
 
Another option is to get one card covered in paint and place a second dry card on top to transfer the paint.

left is the top (dry) card, right is the painted card. 
 It's more smooshy and diffused - a nice effect.


Or, if you're me, you'll be all, "That's dusty rose and brown. EW!"
All you need to do is add a pop of a bright color and the whole piece perks up.
You'll also note that I intentionally avoided water spattering the fuchsia bit so it has more weight in the background.

Make a lot of backgrounds because A. You've already hauled your stuff out, and B. it makes you less attached to the success of any one piece. 
For example:


I love the tulippy one with all the white space (right) but think the left one looks like someone sneezed paint all over  the place. *shudder* But who cares... I made about 20. No one card is a deal breaker. And that messy one - punched, torn into strips, or with some stamping will probably be pretty great too. 

So these soft ones are for Valentines, there is enough color range to suit all my friends different personalities.


And these wild, bold ones with lots of luscious white space and distinct edges are for art journalling and future projects. FWIW, I've never used my black watercolor before. Oh, my! It's my new favorite thing.


Now that we've made a big pile of painted cards, let's finish them off. 
Once they're dry, of course. Too soon and it'll be a big mess.

Stamp your image on the card.

(don't mind the bit of acrylic on this one. Years ago I'd stamped off some bubble wrap into my watercolor pad and decided to not worry about it)

Stamp again on your map or book paper. Since I'm only filling in the heart I only stamped the top half. 
Cut out the heart. 


Glue the heart into your image.

Be careful as your watercolor will react to the glue. I put the Mod Podge on once, with a brush, not going back and forth over the area. Just one quick pass. Then you smooth down the map paper and carefully remove any seeping glue with your finger. No need to go over the top of the map paper like you would with a collage. This is just a card and you'll risk mixing up the paint.


Gild the edges with gold paint. I could only find my gold fabric paint (which worked fine). The edging really creates a beautiful frame, adds a little glamour and accentuates any torn edges.


And there you go! This set of nine cards took very little time.
They are different enough to keep me engaged but I didn't have to worry about design choices at every step.

If you click on the picture to see it full-sized you'll notice that there are a few with french dictionary pages instead of maps. Again, the variety keeps me interested and if the colors of the map and the card were too close I needed more contrast. 


I'll add a sentiment or a note on the back, and  leave the fronts plain so they can be enjoyed year round. 

Sending a little piece of art in the mail is sure to bring smiles to your loved ones. 
If you try this please let me know.

Warmly, 
~~~~~Nicole

Tuesday, January 13, 2015

Hand Carved Cake Stamp and Card Set


This year I'm going to try to be a bit better about birthday cards. I'm absolute rubbish. And Facebook made it easier to remember but I left Facebook last year so I'm right back to not.

Carving a cute new stamp seemed as good a place to start as any, no?

And this card set ensures at least four people will get cards this year. Which, sadly, will be a huge improvement.


All the cards were made the same way:

1. Stamp image on white card stock using black Staz-On ink
2. Stamp image on post it note. Cut out and use as a mask to protect the nice clean cake image.
3. Dab Ranger Distress Ink through 'stencil' with a foam cosmetic sponge - in this case the stencil was some old fancy cut out paper... KI Memories I think. Laser cut cardstock was quite a thing a few years back. Note: On the top card, I stamped a Hero Arts French Script stamp with distress ink, let it dry and then stenciled over top.
4. Add a sentiment - these are Papertrey stamps on bits of Gelli Prints.


This one was a little different, same idea but with a number laser cut, no ombre effect and I stamped the sentiment right onto the card like a ribbon.


Tuesday, December 16, 2014

Lipstick Hand Carved Stamp Set and Cards

(click on the pic to see the details)

A lipstick stamp sounded like a fun thing to carve and making into components for both the outline and the fill was a cinch. Basically all you need to do it transfer your drawing to your rubber twice and for one carve the outline and the other the lipstick, tube and neck. Since the fill pieces are a little smaller than the outline there was more than enough room to cut them apart. 


Now I can't stop making cards with this adorable stamp.


Clean and Simple


Busy, fun and festive.

Look at all that splatter and sparkle!

Somewhere in between. A little glamour, a little graphic.

Another clean and simple with a slightly different palette.

Yep. Totally smitten with this stamp. 


Friday, December 5, 2014

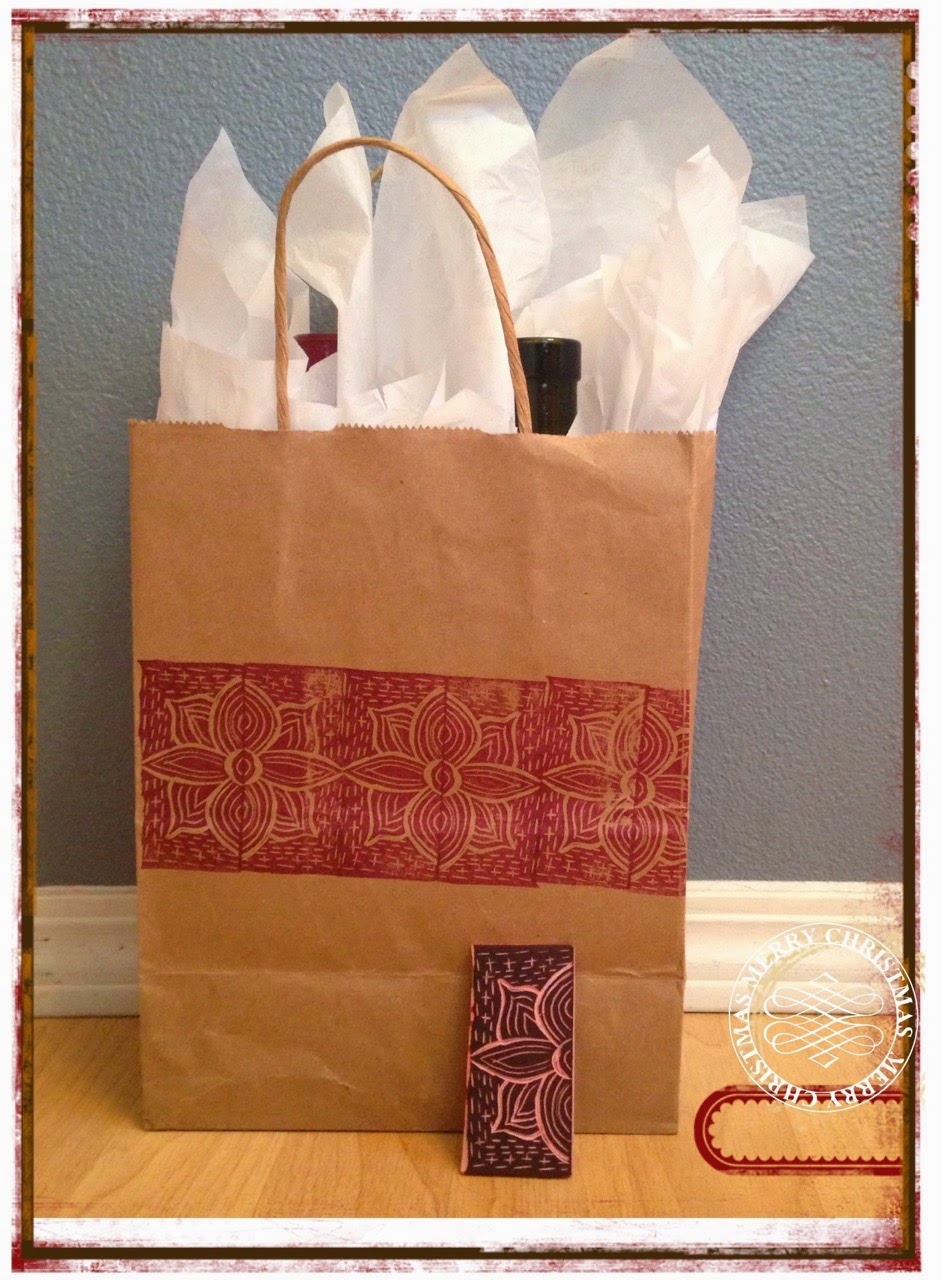
Mirrored Tile Stamp Christmas Gift Bag


Today is going to have to be a super-quick post as we're having a Christmas party tomorrow and I've done nothing. House is a mess, tree is not decorated. Food is neither cooked or even shopped for. 

EEK!

But #CarveDecember comes first so here you go.


Thursday, December 4, 2014

Hand Carved Deer Stamp and Stencil


Day Four of #CarveDecember... where is Day 3 you ask? Not posted but I did carve two stamps. I promise!

This stamp was inspired by Jennifer McGuire's GORGEOUS project for 12 Tags of Christmas with a Feminine Twist on Ellen Hutson. She layered a texture stencil underneath a deer stencil and made a patterned deer. It was so pretty I had to make one. But I do not have a deer stencil. What's a girl to do?

First I drew a deer. The first one looked like a deer-dog so I traced it on a light table (it was 6:00 AM - no taping it to the window for me) and when I got to the neck I moved my drawing up a few squares and lengthened it a bit. The difference between a deer, a dog and a giraffe is proportion. 

Side Note: If you ever want to try drawing cute animals (or plants, or people), I can't say enough positive things about the Illustration School series by Sachiko Umoto. I have three of the books and use them all the time. 


Then I started carving. I love carving early in the morning. 
My hand is so much lighter and I make fewer mistakes.


Once I was satisfied with how the lines looked, I stamped it in Timber Staz-On onto two cream panels of card stock and onto a green one. Using an exacto knife, I carefully cut out the deer where I wanted to add color to the image.

Often I'll make a second solid stamp to fill in the color (like here) but since it was a really large stamp, making a stencil was a lot more cost effective.

The steps below: 
Tape down stamped card. 
Tape stencil over top, lining up image. 
Apply distress ink (antique linen, tea dye and walnut). 

The last picture is the same thing but I sandwiched a second stencil between the deer stencil and the cardstock.


And the results - I have two cards (all I added was some glittery gold washi tape and a bow) a stencil and a stamp. 

Also, for a stamp this size I mounted it onE-Z Mount Cling Foam backing. It's just too large it use without an acrylic block.


Thanks for visiting!