Showing posts with label Stamping. Show all posts

Monday, May 9, 2016

Stamped Gelli Print Wood House

For number eleven of my Hearts and Houses challenge I was inspired by the current prompt at Paper Artsy: Mono-printing

You know this topic is dear to my heart as I'm a huge Gelli Plate enthusiast.
I only had a little tiny sliver of time so I spent it choosing two complimentary mono prints; I wanted to focal image to have neon in orange or pink and the supporting colors to be in the green/blue/teal range. Since these are some of my favorite colors it took moments to find some prints that fit the requirements.

I stamped both of the large images from Lynne Perrella Collection 034 onto the gelliprints and cut them apart to better fit the shape of the house. Then I attached the paper to a wood base. with Mod Podge. To smooth out any wrinkles and bubbles I ran over the paper with a rubber brayer.

While this is quite simple, the detailed stamp and the colorful monoprints pack a powerful design punch. 


Friday, October 9, 2015

One Layer Tag


So I was totally kicking it old school for the SDC:216 Tag Challenge.

First I dug around and found my last Ranger manilla tag (love these!) and I stamped Topher near the middle with Versamark ink... that required finding my versa mark ink. I haven't stamped with the intention to color in a loooong time.

Then I made a mask and had to search for some repositionable glue (are you catching theme here... it's been awhile). With mixed media, repositionable is the farthest thing from what I'm looking for.

Once the mask was trimmed all pretty I let the glue set and then covered up Topher. Then I stamped the Angel wings - 2 sided (I am going to use the heck out of this most awesome stamp) kind of catawampus 'behind' Topher. I peeled off the mask and voila - a shy winged dude.

The rest was cake - copic markers for color and I made the very simple background by scribbling a bit of purple neocolor crayons and then blending it out with white liquid acrylic.

Once it was all dry, I touched up the show laces and wing tips with a black micron pen.

Easy peasy. I even got to take a picture before the rain made things too soggy.

Anyone who's been reading this blog for long knows one-layer is way out of my comfort zone. I'm glad I challenged myself to do this and I'm sure this tag will find it's way into an art journal page or postcard before too much time passes.

FWIW, I had a great time coloring and stamping - it's nice to revisit old favorite pastimes. 


Wednesday, June 17, 2015

Happy 200th Challenge, Stampotique!

This post is to celebrate Stampotique's 200th Challenge over on their blog! 

200! That's a big number!

Back in the day I used to participate in all sorts of challenges but as the years passed I've become more content to do my own thing. 

That said, SDC is the one challenge that often reels me back in  - the talent combined with their overall sense of fun (and love of color) always thrills me.

Here it is:
SDC200: Celebrating our 200th Challenge
Kim Howard is the hostess this week and we are celebrating:
Today is our 200th challenge and we'd like you to join us this week by celebrating.  Create with celebration, anniversary or best wishes in mind.  
stampotique SDC200


So Happy Anniversary Stampotique!
You guys are AMAZING!!!

Tuesday, December 16, 2014

Lipstick Hand Carved Stamp Set and Cards

(click on the pic to see the details)

A lipstick stamp sounded like a fun thing to carve and making into components for both the outline and the fill was a cinch. Basically all you need to do it transfer your drawing to your rubber twice and for one carve the outline and the other the lipstick, tube and neck. Since the fill pieces are a little smaller than the outline there was more than enough room to cut them apart. 


Now I can't stop making cards with this adorable stamp.


Clean and Simple


Busy, fun and festive.

Look at all that splatter and sparkle!

Somewhere in between. A little glamour, a little graphic.

Another clean and simple with a slightly different palette.

Yep. Totally smitten with this stamp. 


Friday, December 5, 2014

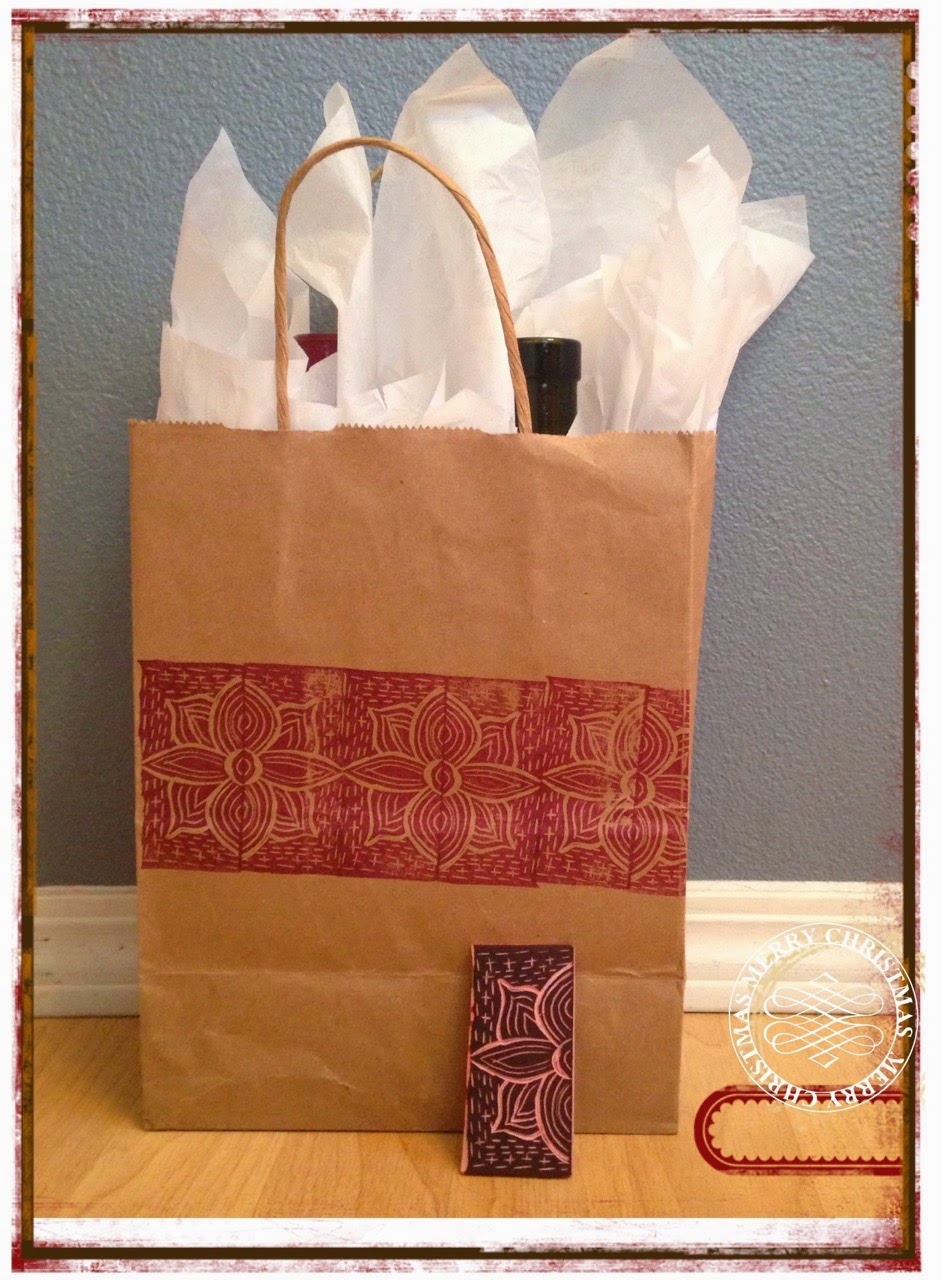
Mirrored Tile Stamp Christmas Gift Bag


Today is going to have to be a super-quick post as we're having a Christmas party tomorrow and I've done nothing. House is a mess, tree is not decorated. Food is neither cooked or even shopped for. 

EEK!

But #CarveDecember comes first so here you go.


Thursday, December 4, 2014

Hand Carved Deer Stamp and Stencil


Day Four of #CarveDecember... where is Day 3 you ask? Not posted but I did carve two stamps. I promise!

This stamp was inspired by Jennifer McGuire's GORGEOUS project for 12 Tags of Christmas with a Feminine Twist on Ellen Hutson. She layered a texture stencil underneath a deer stencil and made a patterned deer. It was so pretty I had to make one. But I do not have a deer stencil. What's a girl to do?

First I drew a deer. The first one looked like a deer-dog so I traced it on a light table (it was 6:00 AM - no taping it to the window for me) and when I got to the neck I moved my drawing up a few squares and lengthened it a bit. The difference between a deer, a dog and a giraffe is proportion. 

Side Note: If you ever want to try drawing cute animals (or plants, or people), I can't say enough positive things about the Illustration School series by Sachiko Umoto. I have three of the books and use them all the time. 


Then I started carving. I love carving early in the morning. 
My hand is so much lighter and I make fewer mistakes.


Once I was satisfied with how the lines looked, I stamped it in Timber Staz-On onto two cream panels of card stock and onto a green one. Using an exacto knife, I carefully cut out the deer where I wanted to add color to the image.

Often I'll make a second solid stamp to fill in the color (like here) but since it was a really large stamp, making a stencil was a lot more cost effective.

The steps below: 
Tape down stamped card. 
Tape stencil over top, lining up image. 
Apply distress ink (antique linen, tea dye and walnut). 

The last picture is the same thing but I sandwiched a second stencil between the deer stencil and the cardstock.


And the results - I have two cards (all I added was some glittery gold washi tape and a bow) a stencil and a stamp. 

Also, for a stamp this size I mounted it onE-Z Mount Cling Foam backing. It's just too large it use without an acrylic block.


Thanks for visiting!


Tuesday, December 2, 2014

Hand Carved Snowman Stamp


Today I carved all the parts of a snowman so I could make as many, as simply as I like.

Snowmen are handy this time of year. 

First I drew the basic shapes. 

I like using lined or graph paper as it helps me keep proportions correct.


Then I traced the accessories on a new piece of paper (the ripped off top of this page to be exact) and checked them for size to see if they fit all right. They did.


Next I transferred the images to my speedy carve. To do this I placed the paper pencil-side down and rubbed the back of it with a spoon. Then I went over the pencil lines with a pen as graphite smudges off pretty easily.


Then carving! First with my big tool and then a finer one for details.


Ta-Da!


While carving I'll ink up the stamp and see if I've removed enough rubber. I'll end up with a lot of test images before I get it right.


And voila! A snowman with very little effort. 

For this card, I stamped the snowman and accessories on a gelli-printed paper and then adhered them to a gelli-printed manilla tag. I cut the tag down to a smaller size and layered it with some leftover book paper (from yesterdays heart card) and a torn baby wipe for the base. I love the richness old painted wipes bring to a background. 


My plan is to make a sun using a snowball as the circle and the nose for rays. I'll report back how it goes :-)

Monday, December 1, 2014

Gelli Printed Heart Tag and Card


Julie Fei-Fan Balzer created a very cool challenge called CarveDecember where you carve a stamp a day all month. I couldn't resist. 

I was torn between making a heart or a texture stamp as I've been playing with clay recently and texture is always useful. After going back and forth a bit I decided to do both - a heart with a pattern so it could provide random swirly dots or be a proper heart, as needed.


One great thing about long hearts is that they interlock into a border very easily. 
For the tag above I simply stamped in Staz-On over top a gelli-printed tag. Then I stamped the heart again on white book paper, cut it out and attached it with foam tape.


For this card, I stamped the heart three times on book paper, cut them out and sewed through the middle of the stack. Then I added them to a stenciled, stamped and gelli-printed background and sewed around the edge. 


Happy December!


Sunday, November 30, 2014

Beer Advent for My Husband


It's a Christmas Beeracle!


Beer Advent. Yeah, not exactly orthodox but huge points on the 'love one another' scale :-)

To make this, I went to a local taproom that sold individual bottles and cans of beer. I picked out 25 (Yes, the 25th is Christmas, but I thought he'd like a beer that day too.) The beers are all different and they run the gamut from pale German lagers to thick, rich stouts. Yum!


For decorating, I wrapped each one up in kraft paper, used washi tape for color and stamped the numbers on each one.

Tip: If you don't want to micromanage your beer choices, wrap first and then number. It was a huge bonus to me not to speculate on if porter is a Thursday kind of beverage. 

You can simplify this by buying four favorite six packs or even two cases. 

I bought some very fancy beers and the whole thing came to $64. Had I gone with six packs it would have been half that - about $32. 

Friday, August 1, 2014

Bunches of Bird Tags


I've been carving a lot of bird stamps lately.


And before I send them off to their new home (mainly loved ones) I usually stamp myself a stack of tags. 


Tags are an absolute lifesaver for last minute gift giving, note writing etc. 

Your neighbors dog got out again, writing a quick note about closing their damn gate seems positively friendly on a tag while maybe a bit less so on a post-it.


Giving jam, flowers, a little gift... the tag really makes it special. 

Plus the manilla has a nice weight to it, I often fussy-cut out the images and add them to art journal pages. 

Here's another hand-carved bird, this one is for my mom-in-law:


I stamped oodles before dropping it in the mail.


I really like how the carving stands alone as a powerful, attractive image. 


Let me know how you like to use tags and I'll pick a comment or two and drop some in the mail as a gift. 


Friday, June 13, 2014

Put a Bird on It: Hand Carved Stamp


I adore carving stamps. Seriously, it's so relaxing and it really zones me out in the best way possible. So when I was coveting a very popular bird stamp I decided to make one instead. 

Of course it's completely different in look and feel from the purchased kind with their smooth, thin lines; but I love the rough, hand-of-the-artist look of them. 


As I am prone to do, I made a second stamp to 'color' my birds. This is a tremendous time saver and I always feel so clever when I make a stamp to fill in the colored parts. 

This could have easily been a three-step stamp if I wanted to add another for shading but I really like the look of the single color.


Making a card was easy as can be - a little Basic Gray, a PL journal card and my bird. 


This tag is a mix of collaged gelli-prints (deli paper), paint, stenciling, my stamp (on a manilla tag for heft), torn ledger paper and some sequins. I really like how the strips of gelli-prints imply trees without being too literal. 


Thanks so much for stopping by!