Showing posts with label Pirate's Life. Show all posts

Tuesday, December 11, 2012

Christmas Angel Tag - Bombshell Style


You know I love my Bombshell Stamps. So when I saw an angel tag by Carolyn Peeler for the 12 Feminine Tags of Christmas I couldn't help but add the wings from the Sacred Heart set to the pirate from A Pirate's Life.  Boom! I got me an angel... more like a Victoria's Secret angel but...

It was fun to do some masking and coloring - it's been awhile.

In addition to the glitter, there is a border of glass micro beads around the edge. It gives the tag great texture, shine and interest that the photos aren't quite capturing. Silly winter skies and the trouble they wreak on picture taking!

The color scheme, glass beads and pearl were all inspired by the Moxie Fab Tuesday Trigger


Thanks so much for stopping by :-)

Monday, June 4, 2012

A Family that Doodles on Index Cards Together...

That's the saying, right?


I got a little behind in taking pictures of everyone's Index Card a Day cards over the weekend so this post will have a bunch of catch-up going on.


I've been doing other stuff too but it's in various stage of completion so it's all coming soon :-)

Eldest:

 Husband, using the prompt, "pen testing"


Middlet using the prompts "dragonfly" and "dictionary":


Youngest, this is a family cartoon character called 'Eetr" who is the central figure in all of their tall tales. My boys have been telling Diggy and Eetr stories since they were small:


And mine, featuring A Pirate's Life from Bombshell Stamps using the prompt "map" because really, who other than pirates use maps nowadays?


We're getting quite a stack of ICADs!

Sunday, July 24, 2011

Treasure Card: Heat and Dry Embossing Galore


This is my entry for the July Bombshell Stamps Sketch Challenge.
Here's Kathi's awesome sketch:
Details:

It's also my entry for Shopping Our Stash Challenge 9: Technique Turn Back. The technique I used was heat embossing with funky embossing powder. I NEVER do that anymore. So I hauled out my verdigris, gold, bronze and went to town with the Versamark ink. What a mess! I can totally see how this technique got left in the dust. On the other hand, the effect is really stunning. I still can't believe that started out as a plain piece of white paper! Thanks to the girls at SOS for inspiring me to bust out an oldie but a goodie.


I had embossing on the brain because Simon Says Show Some Embossing... it's just fun to say isn't it. Now I want to play Simon Says... do you think the kids will mind? Anyhow... have you checked out their challenges - awesome sauce!

Pirate's Treasure is also my entry for the GC110: Spicy Supply Challenge - Gears, Cogs and Watch Bits. I'm so glad they posted that challenge as I'd never used this embossing folder even though I made a huge fuss about 'having to have it'. There's a lesson there for me.

Friday, May 20, 2011

Pirate Cakes: Maple, Cinnamon, Caramel and Coffee Goodness

Calling all Scallywags to make these pirate cakes. 


This recipe was made by boys, for boys - it's not pretty, exact or frilly but it's delicious and plentiful.
We call this,

A Murder of Pirate Cakes


It seemed a fitting treat for the weekend when Pirates of the Caribbean: On Stranger Tides hits the theaters. Anyone still excited about the Pirates franchise? 

Okay, enough about movies... let's talk cake!

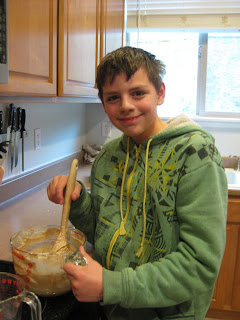
The key to this recipe is that you need a scruffy looking helper - 
preferably one in need of a hair cut and a clean shirt. I used this one:

Such a cute crewman. 

The cake is dense, spicy and not overly sweet which is lovely as it lends itself nicely to a richer frosting.
Don't be overly concerned with the crazy blend of flavors, they meld together well and the coffee (the oddball of the group) lends depth to the glaze but the flavor is nearly undetectable. 

For the Cake:


1/4 cup butter
1/4 cup vegetable oil
1/2 cup granulated sugar
1/3 cup brown sugar
2 eggs
1 1/2 teaspoons baking powder
1/4 teaspoon baking soda
3/4 teaspoon ground nutmeg
1 teaspoon cinnamon
3/4 teaspoon salt
1 teaspoon maple extract
2 2/3 cups all-purpose flour
3/4 cup non-fat milk
1/4 cup Cinnabon flavored International Delight Creamer :


(It's also fine to use a full cup of milk and no creamer but where's the fun in that?)

Directions:

Preheat oven to 425 degrees F. Line pan with cupcake liners or spray with nonstick cooking spray. We made 24 mini-sized and 10 regular pirate-sized ones. They're SO cool!


Beat together butter, vegetable oil, and sugars till smooth. Beat in eggs, one at a time.
Mix in, baking powder, baking soda, nutmeg, cinnamon, salt and maple until just combined.

Stir the flour into the butter mixture alternately with the milk, beginning and ending with the flour until thoroughly combined.


Spoon batter  equally into lined pan.


Bake until cupcakes are pale golden and an inserted toothpick comes out clean; roughly 15 to 17 minutes for pirate-sized cupcakes and 8-10 minutes for minis.

Cool in pan for 5 minutes, then transfer to wire rack and cool 10 minutes before frosting.


To make the glaze:


1 C packed brown sugar
½ C butter
¼ C Cinnabon International Delights Creamer (or milk)
1 tsp maple extract (vanilla is nice too)
Icing sugar (we use about 1 1/4 cups-ish)
Cold Brewed Coffee as needed - several tablespoons

Combine brown sugar, butter and creamer or milk in a saucepan; bring to boil over medium heat.
Cook and stir for two minutes.
Remove from heat and add maple.
Cool to luke warm. (I sit the pot in a bowl of ice cubes and stir like crazy. The temperature comes down really quickly.)

Beat in icing sugar until it reaches spreading consistency.


This always looks a little greasy at this stage. You can either add a little more icing sugar to make a stiff frosting or stir in a few TBLs of brewed coffee to thin it to a heavy glaze. Since the frosting is very rich, I prefer the glaze method as it's not as intense and it has a beautiful gloss.

Dip:

Drip:

Tap:

Add a flag and let it set up:


The frosting will stiffen as you're dipping the cupcakes, beat in a few more spoonfuls of coffee as needed.

This is Cake # 16 of our 52 Cakes project. I need to pick up the cake-pace!

I love trying fancy creamers  but not all of them are winners. To be honest, Coffee Mate brand is my favorite and the International Delights can be so-so... hence the baking with it. But regardless of how they taste in my cup o' Joe, they're a marvelous flavor addition to baked goods, homemade puddings (think coconut creamer in chocolate) or added to frosting. Yum!

Anyone else use them when they bake?

P.S. The cupcakes were a teeny bit dry. I think I overcooked them, but next time - just to be sure- I'm going to replace the oil with applesauce. That always does the trick.


And here's an old pirate card, I forgot how much I loved coloring skin with markers on watercolor paper. Blending is a breeze!


Stamps: Bombshell Stamps, A Pirate's Life

Did anyone guess my exciting news yet? I've been having a blast playing with the goodies in the box. Can't wait to send one along to one of you :-)

Linked Up With:
Tatertots and Jello
Whipperberry

Thursday, May 6, 2010

Graffiti Backgrounds

I love a fresh crisp piece of hot off the presses paper as much as the next gal - trust me, there is a shelf full of Crop Hoppers bearing witness to my obsession. But sometimes, when I've seen the sheet I so desperately covet as the base of the seventh card or the umpteenth scrapbook layout on the blogs I visit I lose heart a bit. Some days it all seems so done.

Luckily I have the perfect pick-me-up for times of paper panic. I make my own. No silly, not the paper itself (although to be honest, I have on occasion) - the pattern that makes it pop :-)

Supplies: Sorry, can't help you. What do you have on hand?

I recommend using something sturdy - like watercolor paper - as a bottom layer, but I've had equally luscious results on butcher paper, scrapbook paper, card stock, plastic, transparency... see, the sky's the limit. You also need colored stuff: paint, crayons, markers, ink, tea, colored pencils, Sharpies. And I love to add some layers with text, collage etc. Junk mail, comic books, manga, menus etc. Markers or paint pens for scribbling/journalling are a necessity and stencils are a terrific addition. My favorite "stencils" are punchinella - you can get it in a variety of hole shapes and sizes. Awesome!

Each piece of make-your-own designer paper will be different. I wanted something with an edgy, urban graffiti feel - kind of Alisa Burke meets inner city. Here's what I did:

Step One: Dribble paint on edges. Smear around with a baby wipe.


Step Two: Squirt complimentary color in white space. Blend with baby wipe.


Step Three: Spritz with dye mister (I used Glimmer Mist, available at Gauche Alchemy shop).


Step Four: Start adding interest. Here I sprayed close up with fabric spray paint and tilted the paper to make it drip. Then I stenciled some letters haphazardly around the page.


Step Five: Go in with complimentary color (yellow here) and add large sections of paint. Use punchinella as a stencil by pouncing chalk ink through the holes. I find the pattern unifies the elements.


Step Six: Take a white or metallic paint pen (black is good too but very, very bold) and journal all over the page. I tend to get "stuck" so I often write song lyrics or poems I've memorized. Keep it loose and messy. Don't worry if it looks like ka-ka; it'll be fine.


Step Seven: This pic is bigger so you can see the details. Rip some text, comics etc and glue them to your substrate. Don't cover up all your hard work, just add some pieces here and there. Then go over it again with paint, punchinella and stencils until it integrates into the piece. If the look seems unbalanced don't worry about it. If you can't not worry *raises hand* then add a few dribs and drabs of dry brushed paint to make it look right to your eye. In this example, I added the green paint to the edges. Made all the difference in the world. Now leave it alone to dry.


Step Eight: It's so horrible I couldn't take a picture. Kill your darling! What? Cut this beautiful piece of awesomeness into useable pieces. *GASP* I know!

Here's some ideas: Card Front and ATC Blanks. Keep your scraps, they're awesome to craft with.


Then wow your friends and yourself by making cool projects. This card was made with the ATC scraps:


Features: Punchinella, Career Girl Mixed Media Kit, Scarlet Fever Mixed Media Kit from Gauche Alchemy and Bombshell Stamps.

I made little vignettes with Foreign Text and Wholly Sheet:


and attached them to the (matted) ATC Blanks.

Urban Angels:


These ATCs feature Bombshell Stamps and wings from the beading section at Michaels.

Thanks so much for joining me as I made my own Daring Background: Graffiti Style. It's truly a ton of fun and the results are well worth the effort.

I had so much fun making this that I signed up for Alisa Burke's Graffiti Chic Online class; so don't be surprised if you see a lot more of this style of art from me :-)


*Previously published at Bombshell Stamps and Gauche Alchemy*